


Fun and very easy dinner shared here. It is interesting having my six year old granddaughter for the summer, as she has very specific likes and VERY specific dislikes. No tomatoes, but loves tomato sauces. So the other night I bought some Lamb Loin Chops and rubbed them with lots of herbs from my garden and olive oil. We grilled them quickly on barbecue and that was a huge hit, just simple and delicious. Carrots are high on her lists of favorite veggies, so sautéed with butter and fresh dill from the garden and they were devoured. Funny, but that is the one cooked vegetable I do NOT love. She kept asking me why I didn’t eat the carrots. America’s Test Kitchen bread, with very little kneading was totally tasty and another big hit with Claire and my husband. But risotto with Reggiano Parmesano was not in her palate, so she would not even try it, even though she loves cheese and loves rice. So you never know what will make it and what will not. The salad with greens from my garden, tomatoes and avocados, was a “don’t bother to put on her plate”. I don’t think I liked lettuce or tomatoes at that age either.
Since the most of the dinner was simple and as easy as described I will just post the recipe for the bread.
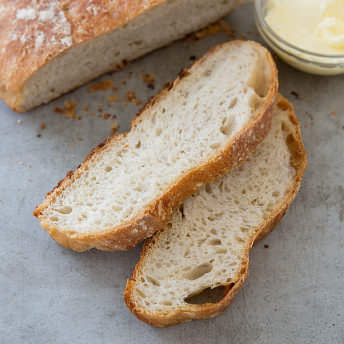
Almost No-Knead Bread
A no-fuss recipe that is revolutionizing home baking trades flavor and reliability for ease. Could we improve the bread’s bland taste and make it rise high every time?
WHY THIS RECIPE WORKS
To avoid lengthy and tiresome kneading, we let our bread dough sit for 8 to 18 hours, during which a process called autolysis develops gluten—the protein that gives baked breads their bubbly, chewy crumb structure. After that, just 15 seconds of kneading does the trick. To give our bread more flavor than standard no-knead recipes, we add vinegar for acidic tang and lager beer for extra yeastiness. We bake the bread in a preheated covered pot to create steam, producing a springy interior, and then finish baking it uncovered for a beautifully browned crust.
INGREDIENTS
INSTRUCTIONS
Makes 1 large round loaf
| 3 | cups (15 ounces) all-purpose flour |
| 1 ½ | teaspoons salt |
| ¼ | teaspoon instant or rapid-rise yeast |
| ¾ | cup plus 2 tablespoons water, room temperature |
| 6 | tablespoons mild-flavored lager |
| 1 | tablespoon distilled white vinegar |
| Vegetable oil spray |
Use a mild-flavored lager, such as Budweiser (mild nonalcoholic lager also works). In step 3, start the 30-minute timer as soon as you put the bread in the cold oven. Do not wait until the oven has preheated to start your timer or the bread will burn. The bread is best eaten the day it is baked, but it can be wrapped in aluminum foil and stored in a cool, dry place for up to two days.
1. Whisk flour, salt, and yeast together in large bowl. Add water, lager, and vinegar. Using rubber spatula, fold mixture, scraping up dry flour from bottom of bowl until shaggy ball forms. Cover bowl with plastic wrap and let sit at room temperature for at least 8 hours or up to 18 hours.
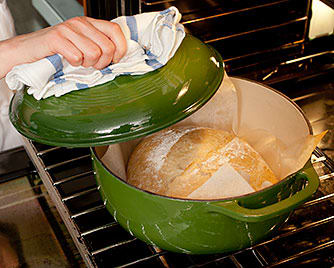
2. Lay 18 by 12-inch sheet of parchment paper on counter and spray with oil spray. Transfer dough to lightly floured counter and knead 10 to 15 times. Shape dough into ball by pulling edges into middle. Transfer dough, seam side down, to center of parchment and spray surface of dough with oil spray. Pick up dough by lifting parchment overhang and lower into heavy-bottomed Dutch oven (let any excess parchment hang over pot edge). Cover loosely with plastic and let rise at room temperature until dough has doubled in size and does not readily spring back when poked with finger, about 2 hours.
3. Adjust oven rack to middle position. Remove plastic from pot. Lightly flour top of dough and, using razor blade or sharp knife, make one 6-inch-long, 1/2-inch-deep slit along top of dough. Cover pot and place in oven. Heat oven to 425 degrees. Bake bread for 30 minutes.
4. Remove lid and continue to bake until loaf is deep brown and registers 210 degrees, 20 to 30 minutes longer. Carefully remove bread from pot; transfer to wire rack and let cool completely, about 2 hours.
TEN STEPS TO EASY RUSTIC BREAD

1. HAND-MIX INGREDIENTS: Combine flour, yeast, and salt; then stir in water, beer, and vinegar and fold it all together. No mixer required.
WHY? This bread will form gluten as it sits, so there’s no need for a lot of mixing at the start.
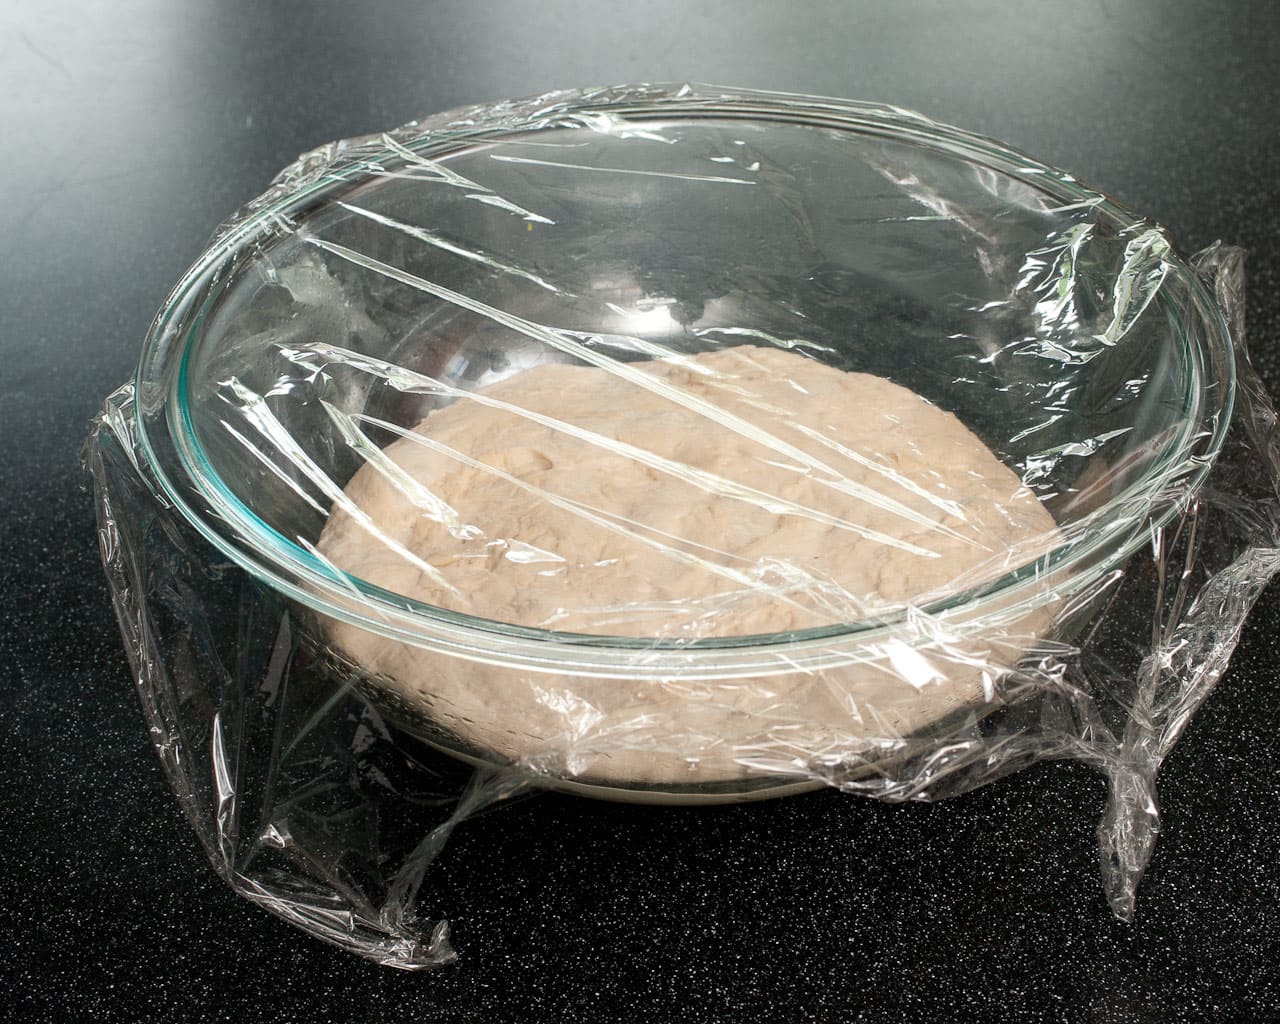
2. LET REST: Cover the bowl with plastic wrap and let it sit on the counter for at least 8 hours or up to 18 hours.
WHY? Much like kneading, letting the dough sit develops gluten through a process called autolysis.
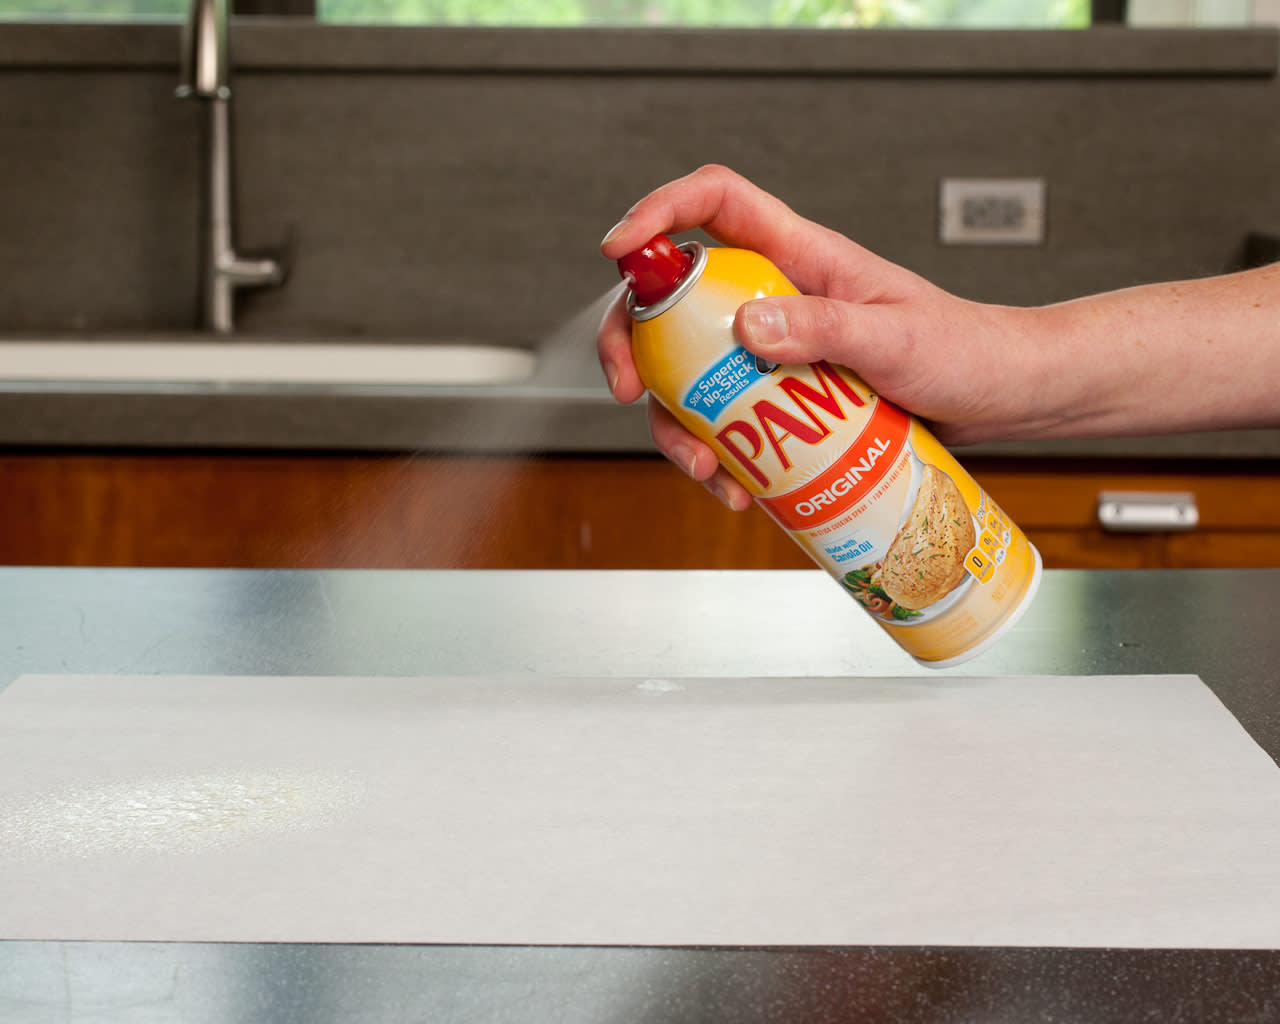
3. PREPARE PARCHMENT: Spray an 18 by 12-inch sheet of parchment paper lightly with vegetable oil spray.
WHY? You’ll use the parchment to move the dough from the counter to the Dutch oven for its second rise, and to remove the bread from the pot after baking.
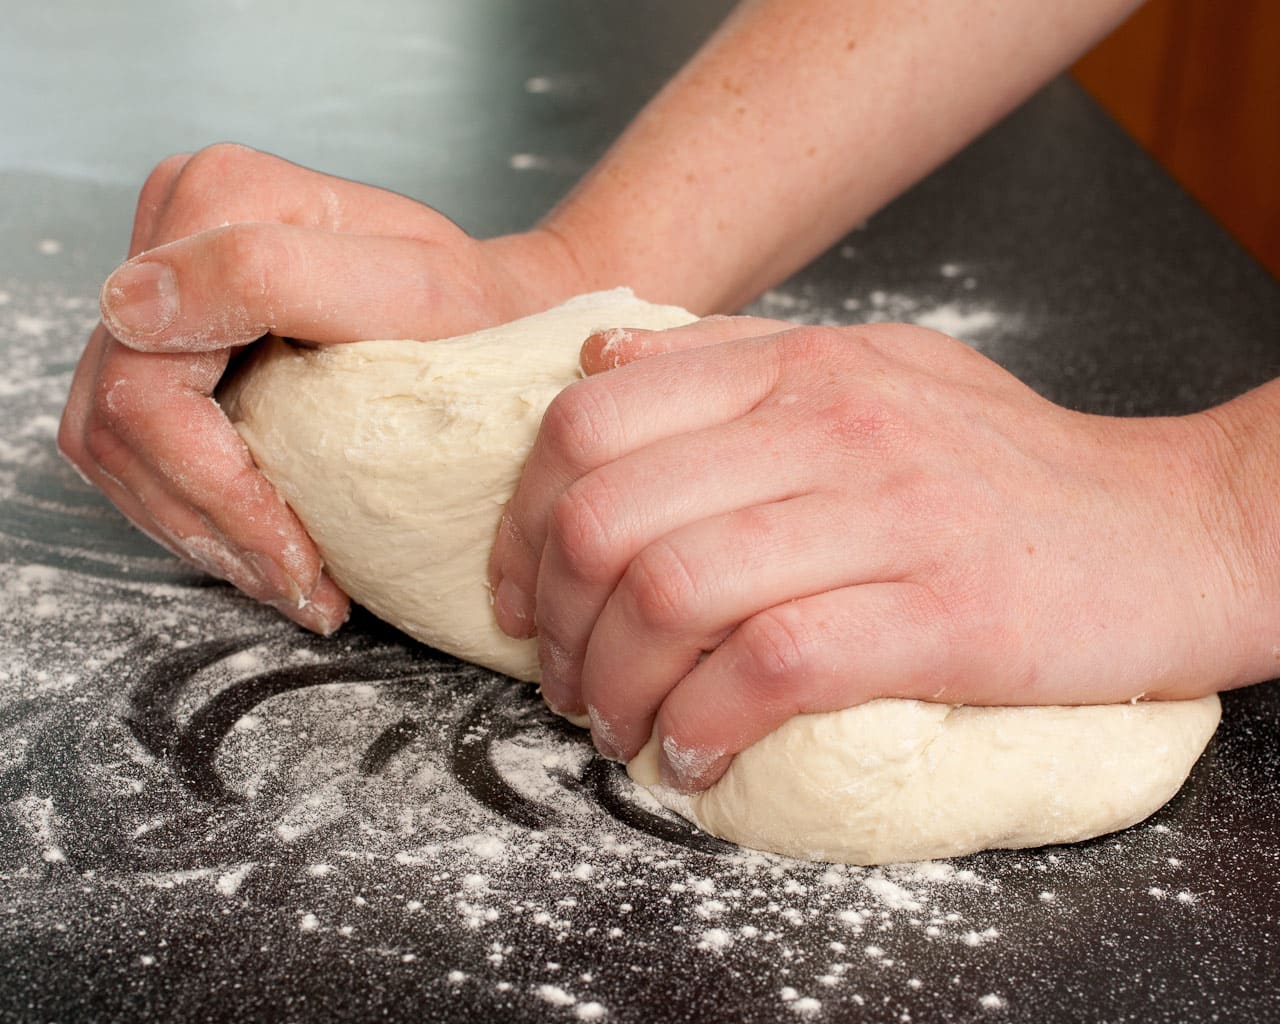
4. KNEAD DOUGH: Transfer the dough to a floured counter and knead it just 10 to 15 times.
WHY? During the long rest, the proteins in the dough break down, making it easier to manipulate, and with less than a minute of kneading, the gluten has been sufficiently developed.
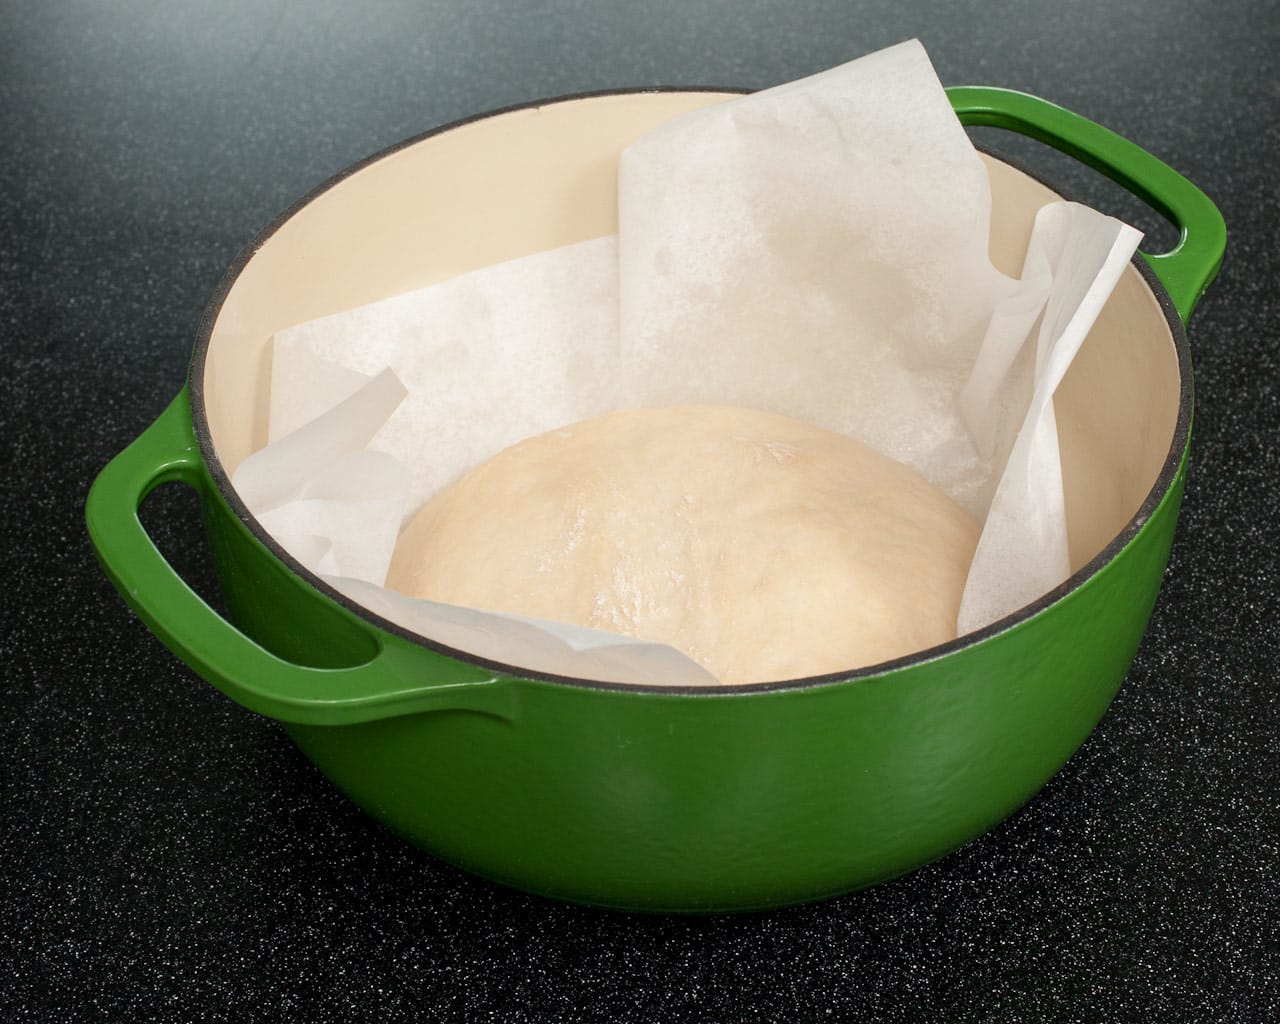
5. SHAPE AND LET RISE: Form the dough into a ball, place it on the parchment, and transfer it to a Dutch oven. Then cover it and let it rise for 2 hours.
WHY? Once shaped, the dough undergoes its final rise, during which the yeast produces carbon dioxide to make the dough puff.
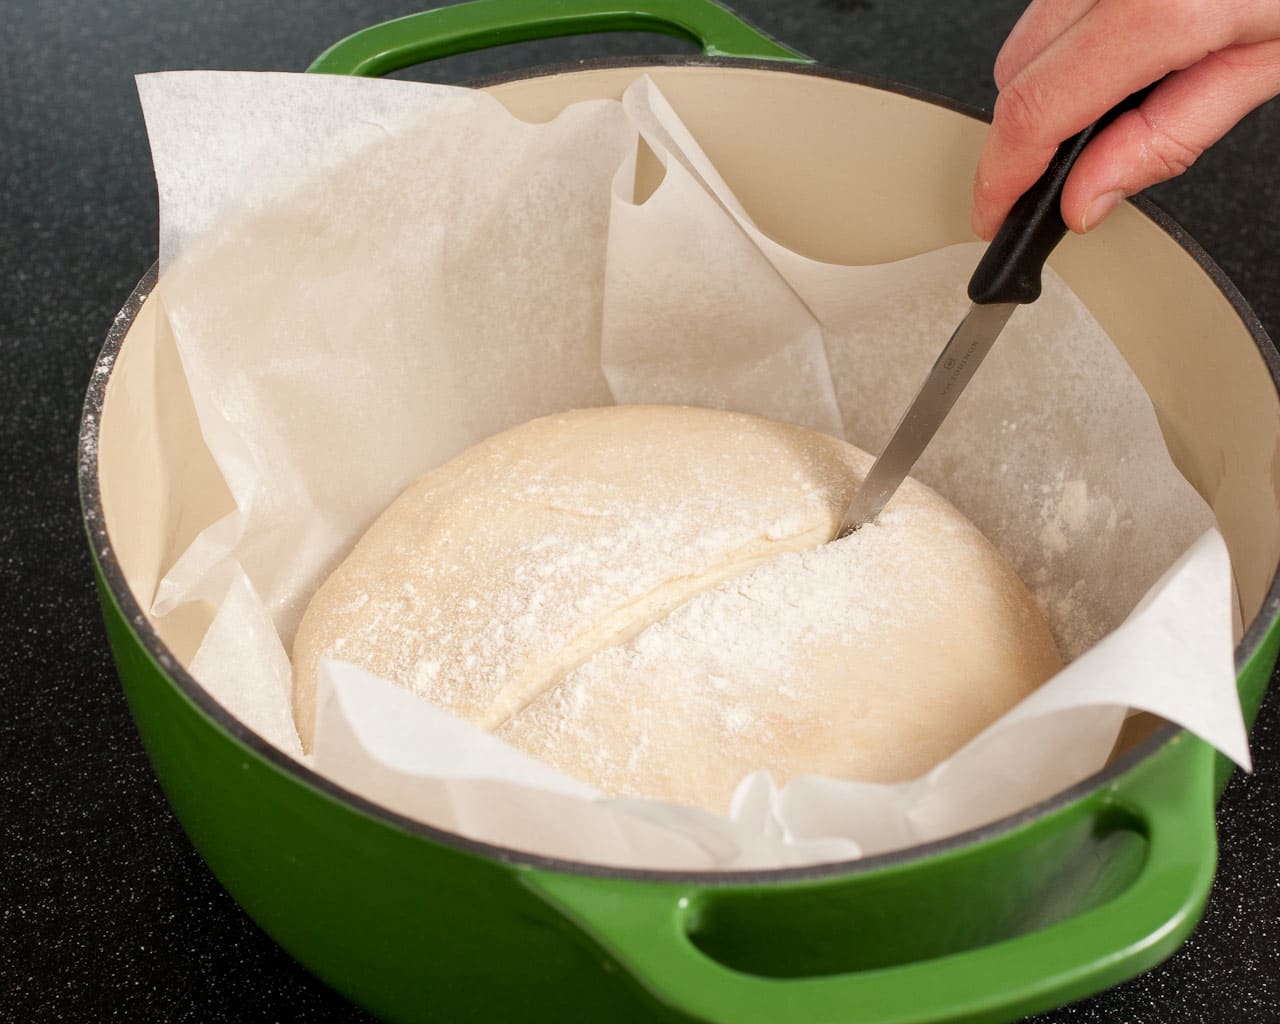
6. SLASH DOUGH: Use a sharp knife or razor to cut one 6-inch- long, 1/2-inch-deep slit along the top of the dough.
WHY? Slashing the dough allows steam to escape so the loaf bakes evenly, preventing splits and cracks.
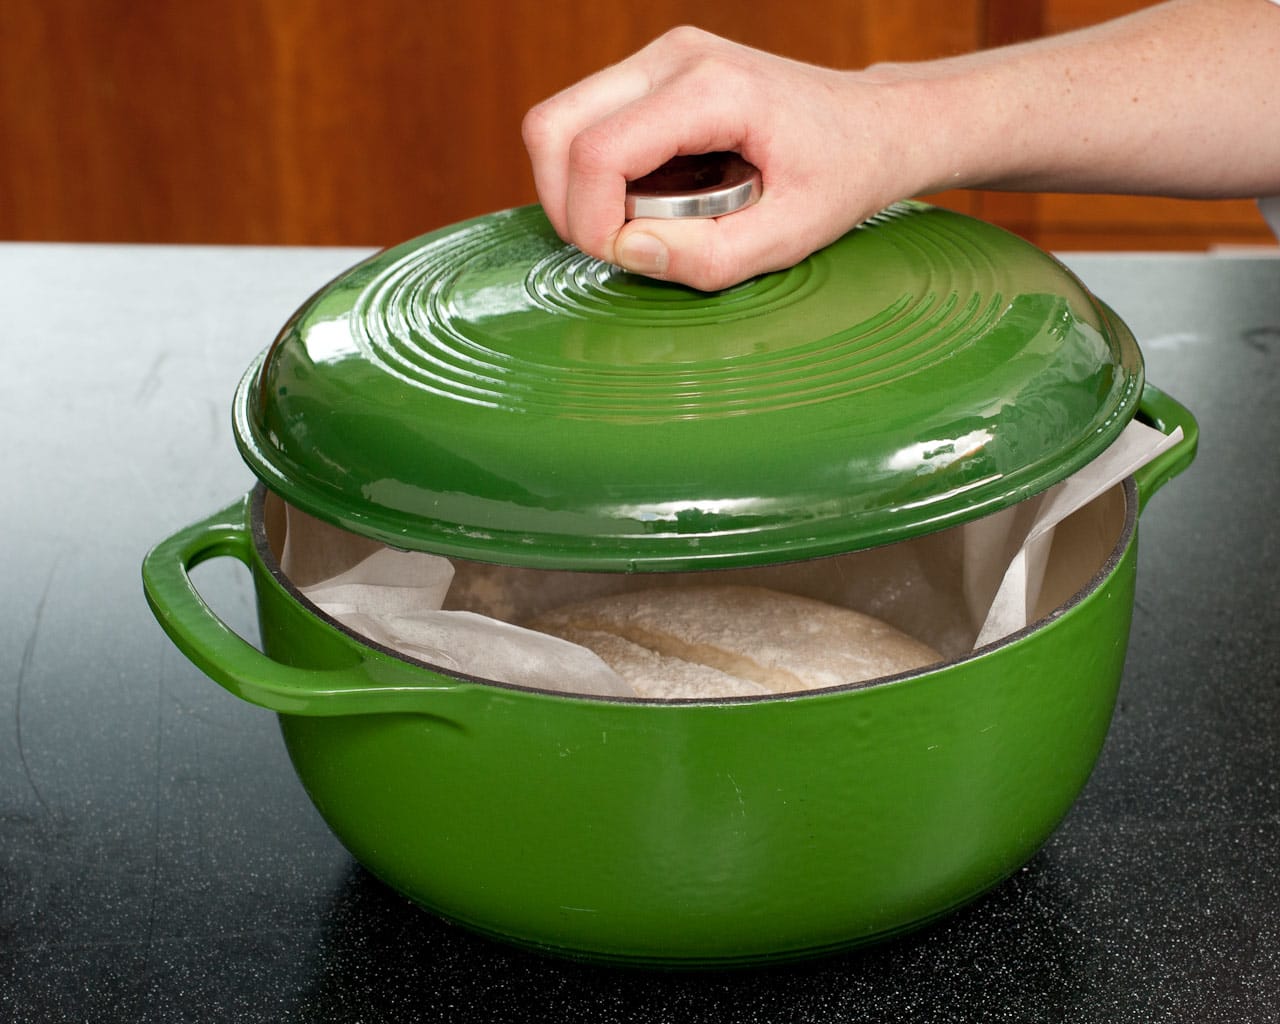
7. COVER UP: Place the cover on the pot.
WHY? The covered pot produces a steamy environment that gives the loaf an open crumb structure.
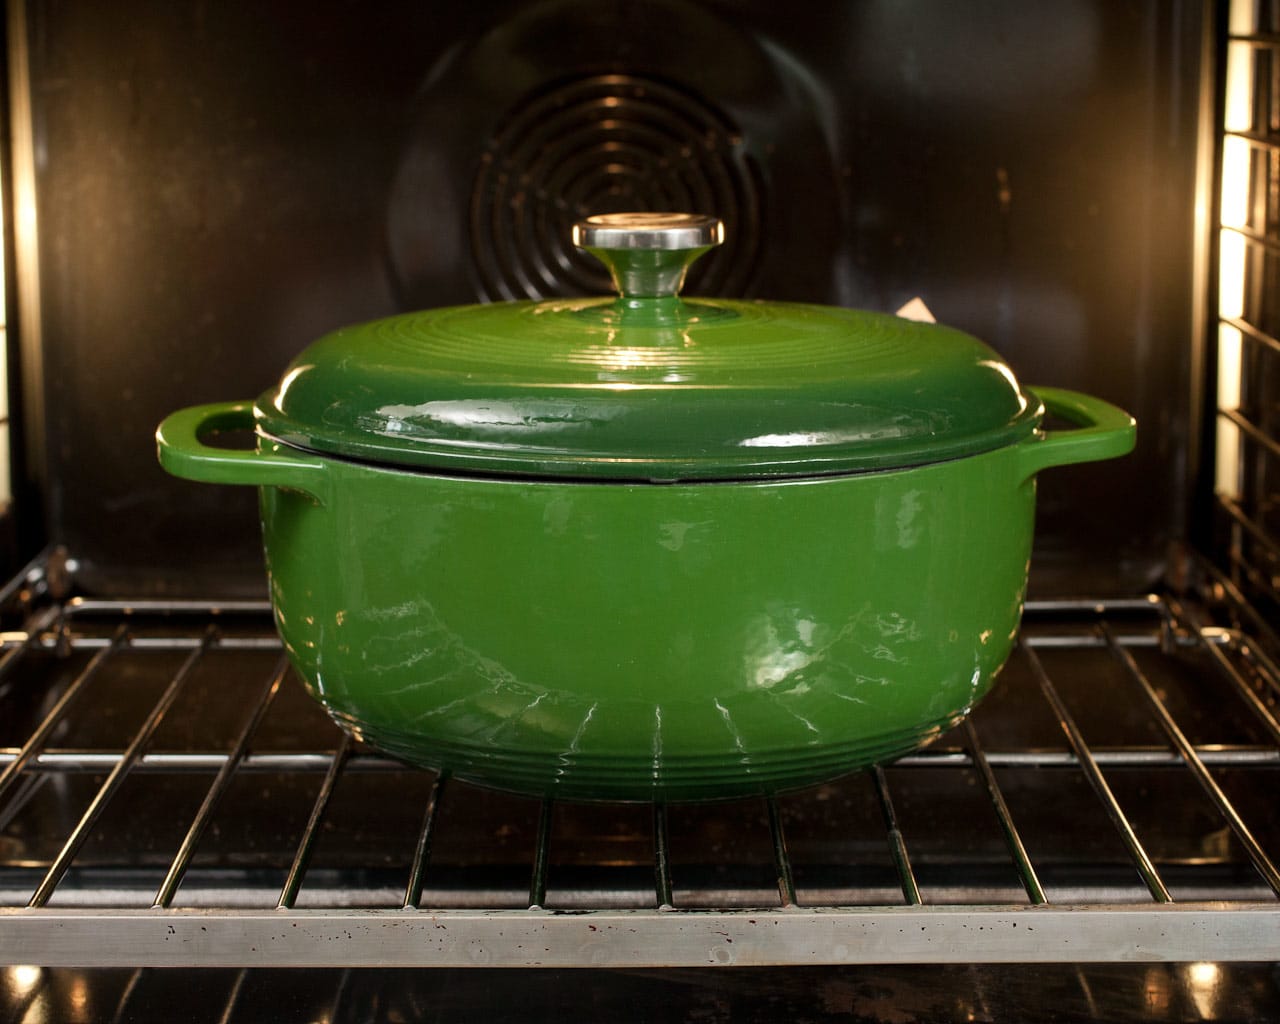
8. START IT COLD: Place the covered pot in a cold oven. Heat the oven to 425 degrees and bake the bread for 30 minutes.
WHY? Starting the bread in a cold oven ensures against burning the bottom, and the bread rises just as much as in a preheated oven.
9. REMOVE COVER: Uncover the pot and continue to bake the bread until it is deep brown and its center registers 210 degrees, 20 to 30 minutes more.
WHY? After the steamy environment has created the ideal interior texture, uncovering the pot allows the crust to brown and crisp.
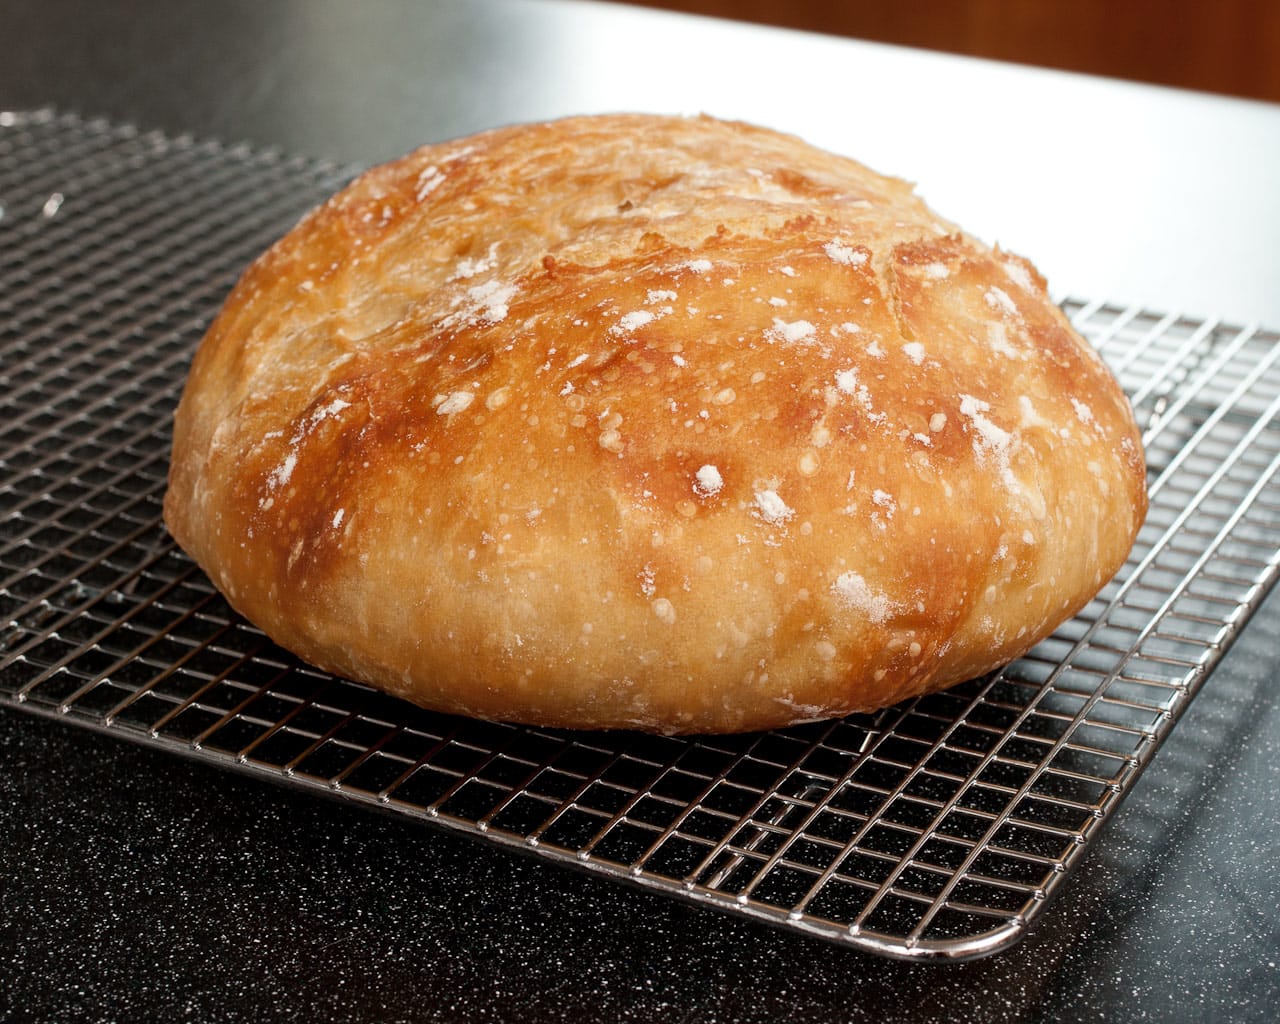
10. LET COOL AND SERVE: Remove the bread from the pot and place it on a rack to cool for about 2 hours before slicing.
WHY? There’s still a lot of moisture trapped inside the hot bread. As the bread sits, the steam escapes giving the cooled loaf just the right texture.