Over the years I have taken lessons from some well-known artists and some not so well-know. I’ve always believed that if I learned something new in my art. It was worth the money if I put it into practice. Sometimes when taking classes, you realize that the painter is successful with their art. However, they may not be successful in their teaching. I took a portraiture class last year. The artist was very precise in how she taught us the art of portraiture. These are a couple of portraits that I painted after the class was complete.
During the course of the class we had models that sat for us. It was so interesting to see the end result using the same model. The two on the right are the same model, painted on different days. The artist that taught the class painted beautiful portraits. I noticed that her female portraits might have all been sisters. She made every one of them look like a classic beauty. I loved that she can do that, but I wanted try to paint them in a more personal manner. I learned and practiced all the proportions and elements of portraiture from her. I tried to add my style to what I learned. I was actively engaged in the class. This involvement allowed me to discover my own approach to creating a portrait.
That said, it made me think about the part of the quote that says: “Involve me and I learn”. As I get a little older I find I have to write it down to remember it. Visually I will always remember, as I am a visual learner. When I travel, I have an easy time finding my way back to the hotel. I always remember what was in the display windows we passed on the way to our destination. Most artists are visual learners.
You can describe how to do something in a 1,000 words. In my case, one photo is enough and I get the idea. I love when artists show you specific techniques that work for them. It is fun to see if you can translate that into your personal style.
How often do you think you should take a new class from a different teacher? I took classes from the same teacher for twelve years. She painted beautiful paintings and I learned a lot about mixing color. I did not learn how to develop my own style. She and a couple other artists opened a small gallery. They would often paint there. They would try to sell their work. I was walking by the gallery one day with my youngest son. He asked me why I wanted to take classes from her. All the pieces in the gallery looked the same to him. That was the last time I took a class from her. It didn’t help that we did not agree politically. We were not allowed to disagree with her politics while in her class. I decided it was time to look for other art classes where politics were not part of the culture.
I went on to take art classes from many different artists. First I had to admire their work, to want to take a class from them. Second, they had to do something similar, but different than how I was painting at the time. I learned so many small tricks of the trade by taking classes from diverse artists. There were some classes I loved. There were some classes that I paid for, but did not go back for the second or third day. Some artists think they should discuss philosophy with you. If you do not agree with their view, then you are “wrong”. I think in any class, it is okay to agree to disagree.
I had a few favorite artists. I took several classes from them. I learned a little something new in each class. Some artists think it’s all in the detail, whereas other artists don’t believe in detail. Photorealism is something I appreciate, but not something I would ever attempt for my own art. I love the idea of something without the perfection of detail. I want more to capture a mood, than painting a perfect copy of a scene.
As I traveled more, I discovered something important. I studied the brushstrokes up close of the masters of the past. We can study them in Art History. However, you can’t really feel them until you are a foot from them in real life. Manet’s work comes to mind, as his brushwork is bold and intentional. You can’t see that in any photo. Going to art museums is a great way to get involved in how things are done. What captures your attention first in any piece you view? To my mind, each artist has a different way of representing his world.
The portrait classes were just a few of the classes that made me think. It is much easier to attend a class and try to mimic the artist/instructor. It is more challenging to take their ideas and make them your own. There have been classes that I have taken when I liked the work of the artist at that time in their lives. As their work changed, the end result was different. I had to think if I wanted to take any more classes from them.
My suggestion is to look at an artist’s work over time and think if you want to apply any of their style to your own art. If there is something that draws you to their art, then by all means get involved in a class or two they are teaching.
I think of Benjamin Franklin’s quote when it comes to cooking, another love in my life. I always loved the cooking classes that were “hands-on”. Once my fingers were in the dough, I would not forget how it felt. I feel designing wonderful food is another art form. It is presumably why I am drawn to it. If I am not painting or writing about art I am cooking. See you in the kitchen!
I took this photo one day we were there for lunch a while back, and finally got around to painting it.
This is a small study of the two chefs busily at work in the kitchen. There was so much gray in the photo, it was a little hard to find color for a painting.
It is an old world wonderful place to have lunch and we have been there several times. I was attracted to take the photo, as the chefs were so intense in what they were doing. Having owned a restaurant when I was much younger, I know how much hard work goes into making a restaurant a success. Mine did okay, but after a year of owning it, running it and being the main chef I closed it, lost a lot of money and knew I would only cook for family and friends going forward.
I have so much more respect for anyone that works in a restaurant, as it is long and hard work. Trust me, I tip the staff a lot better having had my own restaurant experience.
When my youngest son was about two or so, he could not say “hamburger”, so he called them “hammaburgers”. The word just stuck, and to this day we call them that! One of my friends wanted a small painting for her kitchen, so I suggested a hamburger. I had always wanted to paint one. I don’t really eat beef, but love the idea of the American Hamburger.
This painting is only 5 x 7 inches, so it is just a little charmer. I had such fun painting it, I might have to paint more small food paintings. I do love to cook, so that is probably perfect for me.
Every day I receive many newsletters and blogs from food writers and artists. Although I love the idea of most of them, I think they are entirely too long. I love to share ideas, but I do not think I can hold your interest for a long time.
When I am not in my art studio, then I can usually be found in the kitchen. I love the process of cooking. I very seldom eat what I cook, but love sharing it with other people. This one is combination of two recipes, and I cooked it in a rose shaped pan, then cut it about two-thirds down, so I could add the mouse. I was asked to bake a dessert for an upcoming event, so this is a practice cake.
Chocolate Stout Cake with Jameson Mouse and Baileys Glaze
Ingredients
For the Cake:
1½cups (345 ml) Guinness stout
1½cups (340.5 g) unsalted butter
1cup (86 g) Dutch-process cocoa powder
3cups (375 g) all-purpose flour
3cups (600 g) granulated sugar
2¼teaspoons (2.25 teaspoons) baking powder
1teaspoon salt
3 eggs
⅔cup (153.33 ml) sour cream
Make the Cake: Preheat the oven to 350°F. Grease and flour two 9-inch cake pans, and line them with parchment paper circles.
Place the stout and butter in a large, heavy saucepan, and heat until the butter melts. Remove the pan from the heat, and add the cocoa powder. Whisk until the mixture is smooth. Set aside to cool to room temperature.
Whisk together the flour, sugar, baking powder, and salt in a large bowl; set aside.
In a large mixing bowl, beat together the eggs and sour cream. Add the stout-cocoa mixture, mixing to combine. Add the flour mixture and mix together at slow speed. Scrape the sides and bottom of the bowl, and mix again for 1 minute.
Divide the batter equally among the prepared pans. Bake the layers for 35 minutes, until a cake tester inserted into the center comes out clean. Remove the cakes from the oven and cool on a rack for 10 minutes before turning the cakes out of their pans and returning to the rack to finish cooling completely before frosting.
For the Bailey’s Truffle Filling
1 cup whipping cream
1 ounce of Baileys Irish Cream
1 cups dark chocolate chips
2 tbsp rounded icing sugar, powdered sugar
1 tsp vanilla extract
For the Chocolate Whiskey Glaze
1 cup dark chocolate chips
1/4 cup whipping cream
1 ounce Jameson Irish Whiskey
Instructions
To make the cake batter
Combine all ingredients in a mixing bowl and beat with electric mixer for 2 minutes.
Pour into 2 greased 9 inch cake pans. I like to use additional cocoa to dust the sides and bottom of the pans instead of flour and I do usually line the bottom of the cake pans with parchment paper.
Bake at 350 degrees F for 30-35 minutes or until toothpick inserted in the center comes out clean. Cool in pans for 5 minutes before turning out onto a wire rack to cool completely.
For the Bailey’s Truffle Filling
In a double boiler, melt the chocolate chips together with 1/4 cup of the whipping cream. Stir constantly as you melt the chocolate and don’t let it overheat. As soon as the last of the chocolate melts, take it immediately off the heat and let it cool down to lukewarm or cooler.
Whip the remaining 3/4 cups cream with Baileys Irish Cream, the icing sugar & vanilla to soft peaks and fold in the melted chocolate by hand.
To prepare the Chocolate Whiskey Glaze
Melt the chocolate and whipping cream together in a double boiler. Take it just to the melting point until smooth, then remove from the heat and stir in the Irish whiskey until smooth.
To put the cake together if you are doing a normal shaped cake
Trim off the tops of the rounded domes on the cakes if needed.
Place one of the cakes bottom side up on a cake plate. Spread the Baileys Truffle filling evenly on the cake going just to the edges.
Chill this half of the cake in the fridge for a couple of hours to let the filling firm up.
Add the next layer of cake; again with the flattest side up.
Pour the warm whiskey glaze into the centre of the cake. I like to coax it out to the edges with a small spatula to let it run over the edges.
Working on same larger abstracts, I thought all of a sudden it might be fun to paint quite small paintings. I took the three larger pieces I had painted and translated them into a smaller version. It was great fun!
Only the texture in this painting gives away the difference in size between the two. The first one is 6″ x 6″ and the one right above is 24″ x 30″. It is fun to see the differences. The little minis take a lot less time and are very relaxing.
Another example of bigger and much smaller.
There is a much bigger difference between these two! I wonder if you like the smaller or the larger? The ones below are all minis that I plan to grow into larger works with time permitting. I would love to have a pop-up show somewhere nearby to share them with a wider audience.
Life is about the experiences we have, not about what we have or often what we do. I’ve been painting for several years and never really entered a larger competition. I took a class in Mendocino and my teacher suggested I should join the upcoming Mendocino Paint Out; so I signed up. As the weeks went by, I collected frames and made sure I have enough canvases. I made an hotel reservation, and thought I was set to go.
About a week before I was set to leave, I thought I should check with the hotel about my reservation. I am glad I did, as I accidentally booked a room with twin beds and a bathroom down the hall. I upped it to another room with twin beds, but my own bathroom. In the interim, my husband decided to join me for the weekend festivities, so when I arrived I asked if I could upgrade a little more, so I would have one bed, not two. I ended up having a living room, bedroom and bath, which was large, but very old and very sad. The draperies in the rooms, had blackout shades in shreds. At one time they must have been beautiful, but today they were old and looked tired. Everything looked tired. It could have been spectacular with a little love and maybe a little money.
When I got back to my room after dinner, and discovered the TV did not work, I was glad for my IPad and was set to watch a movie on it. But as I pulled back the sheets I noticed a fairly small drop of blood on both the top sheet and the bottom sheet. That did not make me smile, but I was tired from the long windy drive in pouring down rain. I just crawled in, poured myself a glass of wine and watched my “Chick Flick”.
And then it began: The first day, we all (or those who started that day) lined up to have the back of our canvases stamped. We could enjoy viewing the one piece painted before the paint out, that everyone was to bring and hang. It was a wide of assortment of talent and style. The three main artists (the judges) had their work on display. The work was interesting and varied, consisting of two oil painters and a watercolorist. Although their work was artistic, it was not particularly to my personal liking. I would learn a lesson from this later in the week.
So we all took off to find out place to paint the first day. I headed to Little River Inn, where I has stayed before, and enjoyed the distant view. I finished my first painting in a couple of hours, and headed back to town to get a bite of lunch. Waiting in line, a nice young man informed me there was a spider on my backside, before he knocked it off. I had been sitting on a quite old and damp bench painting. As it turns out, I was lucky he saw it and ended its life, as it was a Black Widow. So that was how my week began?
View from River’s End Inn
My first painting was 20″ x 10″, and I painted it in an already framed canvas. I forgot to have this one stamped, so had to call to get permission for it to be allowed. They were very nice, and let me use this the first day. I had time after lunch and it was a beautiful day.
I had discovered when I set up my palette to paint, that my plein air paints had all dried out, so I decided to drive to Fort Bragg to a local and wonderful art store to refresh all my oil paints to the tune of $260. Fresh and new, but an expensive lesson. Since I was already in Fort Bragg, I ventured to MacKercher Park, hoping to paint the lagoon. As I was setting up, a creature crawled out of the lagoon with a direct line toward me. I did not know what it was, but it did not look “friendly”! I had never seen, what I found out a few moments later, was a Crawdad, alive. Luckily a young woman in the parking lot knew what it was, as her father was a commercial fisherman. But I decided I would go to the other side and paint the beach!
When I got to the beach, the fog was setting in and I could not decide what view to paint. It was busy with lots of people. I generally like to paint quietly in my studio or in a more deserted spot for Plein Air. I did spend a lot of time on this one, and I am afraid it shows. By the time I finished my first day of painting I was pretty tired and wind-burned. Nevertheless, I took it back and hung it on my wall. The Art Center provided free pizza that night, and they even had gluten free. That and glass of wine was perfect!
The next day, I decided I would paint one of the beautiful houses downtown. I worked on it most of the day, and wiped it clean at the end of the day, not liking it. The next day I tackled it again and upon finishing it called it “a day”.
By this time, I am beginning to think that I do not work as well under pressure. The next day I went to Fort Bragg with a very nice woman I met to paint at the harbor. I decided to paint something a little more simple. I painted the trees on the hill above the harbor. It was fun and relaxing and we painted in an area where there were not many people.
The last day was a quick draw contest. They give you a location and send you out. You have about a half hour to set up and two hours to paint. This year it was downtown Main Street. You could paint the beach or turn around and paint the town. There were 50-60 artists all painting downtown. I chose to go quite simple and painted the distant shore. I never knew so many small bugs could fly into a painting. Apparently they like the smell of the paint. I still need to finish the piece I did, as a gnat flew into it after I hung it up on the wall.
You can see the bug and the scratch marks, where someone tried to remove it.
That evening they had the rewards ceremony. My lesson with all this was: If you are not particularly fond of the work of the featured artists (judges), why would not be surprised that you would not have selected the same pieces to win the awards? Of all the talented artists in the contest, I did not agree with most of the winners. Many that were by far better, did not win any awards. Of the awards given, often another piece by the same artist was more beautifully executed. One of the awards went to the husband of one of the judges, and it was the one I really thought was color straight from the tube, poorly drawn and actually a little ugly.
I did not go expecting to win. I went for the experience and an experience it was! I met a lot of really nice people, and a few that were a little too overzealous about their art. I ate some great food, and some not so great food. I could not find a good latte anywhere in town, but the raw oysters in abundance made up for it, even if they were flown in from Washington State.
Many artists do ten to twelve of these a year. I found it exciting, exhausting and challenging. Would I do it again? Maybe for a shorter duration? I might try doing another medium, as no one was doing gouache, there were only a couple pastel artists and maybe one doing acrylic. That might up the odds of having a chance to win. Some paint outs provide a free place to stay, so that might make a huge difference expense wise. There are so many factors that go into deciding what to do with your art.
Talk about a quick and easy, yet tasty dinner. I paired with a nice salad and a good Pinot Noir.
For the Grits:
3 cups water
1 teaspoon kosher salt
3/4 cup uncooked quick-cooking or regular grits not instant
1 tablespoon unsalted butter
1/2 teaspoon black pepper
1/2 cup freshly grated sharp cheddar cheese, about 2 ounces ( I used about 4 oz)
1/4 cup freshly grated Parmesan cheese, about 1 ounce, plus additional for serving
1/4 cup chopped green onions white and green parts, plus additional for serving
For the Shrimp:
2 teaspoons EVOO
1 teaspoon paprika
1/2 teaspoon garlic powder
1/2 teaspoon dried thyme
1/2 teaspoon dried oregano
1/4 teaspoon cayenne pepper
1/4 teaspoon kosher salt
1/8 teaspoon black pepper
1 pound medium shrimp, 25 count, peeled and deveined, with tails on
Instructions
In a 3 quart saucepan, bring the water to a boil. Add the salt, then slowly add the grits in a thin stream, stirring constantly. Reduce the heat to low and simmer, stirring occasionally, until the grits thicken, about 5 minutes. Remove from heat, then stir in the butter, black pepper, cheeses, and green onions.
Meanwhile, preheat the oven to 400 degrees F.
In a large bowl, stir together the olive oil, garlic, paprika, thyme, oregano, cayenne, salt, and pepper. Add the shrimp and toss gently to coat. Spread the shrimp in a single layer on a baking sheet lined with aluminum foil. Roast the shrimp for 5 to 6 minutes, until just pink and cooked through.
Serve a top the grits, sprinkled with additional Parmesan cheese and green onions.
Garlic (Allium sativum), is used widely as a flavoring in cooking, but it has been used as a medicine throughout ancient and modern history; it has been taken to prevent and treat a wide range of conditions and diseases.
Garlic belongs to the genus Allium and is closely related to the onion rakkyo (an onion found in Asia), scallion, chive, leek, and shallot. It has been used by humans for thousands of years and was used in Ancient Egypt for both culinary purposes and its health and therapeutic benefits.
National Garlic Day may be a holiday best celebrated alone or with a hefty box of breath mints and a very charitable loved one, but few foods are as deserving of their very own day of recognition as the amazing, edible bulbous plant. Celebrate National Garlic Day on April 19 with your favorite garlic-laced meal and a few fun facts about this delicious, flavor-packed add-in that can do almost anything, from reducing your cholesterol to keeping vampires at bay.
11 Things You Might Not Have Known About Garlic
1. YOU CAN EAT MORE THAN JUST THE STANDARD GARLIC CLOVE.
When you think “garlic,” you inevitably picture garlic cloves, but despite the ubiquity of that particular image of the plant, it’s not the only part you can eat. Green shoots that can be especially delicious and tender when they’re young. Think of them as garlic-flavored scallions. They make a wonderful addition to pestos, soups, and butters.
2. CHINA PRODUCES THE MOST GARLIC.
Garlic is native to central Asia and has long popped up in European and African cooking, too. But it’s China that currently holds the record for most garlic grown, China grows a staggering two-thirds of the world’s garlic, believed to be around 46 billion pounds per year.
3. AVERAGE CONSUMPTION OF GARLIC IS BELIEVED TO WEIGH IN AT AROUND TWO POUNDS PER PERSON.
Even with just two pounds, that means eating roughly 302 cloves per person per year.
4. GARLIC’S HEALTH BENEFITS ARE MYRIAD, INCLUDING AN ABILITY TO REDUCE CHOLESTEROL.
The best way to release the health-happy power of garlic is to cut it, which turns garlic’s thiosulfate compounds into allicin, an antibiotic and antifungal that is believed to reduce “bad” cholesterol as it inhibits enzymes from growing in liver cells.
5. ALLICIN IS ALSO GOOD AT COMBATING HEART DISEASE.
Allicin helps nitric oxide release in the blood vessels, relaxing them and bringing about a drop in blood pressure. . Keeping blood vessels relaxed and lowering blood pressure is good for the heart and the rest of the vascular system.
6. GARLIC CONTAINS VITAMINS, MINERALS, AND ANTIOXIDANTS THAT ARE GOOD FOR YOU.
Garlic bulbs are filled with potassium, iron, calcium, magnesium, manganese, zinc, selenium, beta-carotene, zeaxanthin, and Vitamin C.
7. GARLIC’S USE AS A HEALTH AID DATES BACK TO ANCIENT HISTORY.
It’s believed that Egyptian pharaohs plied their pyramid builder with garlic for strength, and an ancient Egyptian medical document, the Ebers Papyrus counts 22 different medicinal uses for the plant. Garlic pops up in texts from Virgil, Pliny the Elder, Chaucer, and Galen, all of which detail its various uses and share lore about the magic plant.
8. DESPITE ITS ASIAN ORIGINS, ITS NAME IS DERIVED FROM ANGLO-SAXON SPEECH.
A combination of two Anglo-Saxon words—“gar” (spear) and “lac” (plant)—is believed to be the source of the plant’s name, specifically in reference to the shape of its leaves. ,
9. GARLIC’S REAL HEALTH BENEFITS ARE PROBABLY THE REASON FOR ONE OF ITS MOST PREVALENT MYTHS.
Garlic had long been recognized as a wonderful health aid before writer Bram Stoker introduced the concept of the vampire, a beast repelled by garlic to the public with his 1897 novel Dracula. In the book, he uses it as a protective agent, and it’s believed that Stoker lifted that idea from garlic’s many medicinal purposes, particularly as a mosquito repellent.
10. YOU CAN USE GARLIC TO MAKE GLUE.
The sticky juice that’s in garlic cloves is often used as an adhesive, especially for delicate projects that involve fragile items like glass. You just need to crush it to get to the sticky stuff which, despite its smell, works surprisingly well as a bonding agent for smaller jobs.
11. GARLIC CAN CLEAR UP SKIN TROUBLES.
You can battle both acne and cold sores with garlic, simply slice cloves in half and apply them directly to the skin. Hold for a bit, as long as you can stand and while the smell might not be the best, the antibacterial properties of the miracle plant will speed along the healing process.
Here is a great article by Food52 about buying and using garlic:
National Garlic Day may be a holiday best celebrated alone—or with a hefty box of breath mints and a very charitable loved one—but few foods are as deserving of their very own day of recognition as the amazing, edible bulbous plant (okay, “bulbous plant” might not sound super appetizing, but it’s certainly accurate). Celebrate National Garlic Day on April 19 with your favorite garlic-laced meal and a few fun facts about this delicious, flavor-packed add-in that can do almost anything, from reducing your cholesterol to keeping vampires at bay.
1. YOU CAN EAT MORE THAN JUST THE STANDARD GARLIC CLOVE.
When you think “garlic,” you inevitably picture garlic cloves, but despite the ubiquity of that particular image of the plant, it’s not the only part you can eat. Hard-neck varieties of garlic produce “scapes,” green shoots that can be especially delicious and tender when they’re young. Think of them as garlic-flavored scallions. They also make a wonderful addition to pestos, soups, and butters.
2. CHINA PRODUCES THE MOST GARLIC.
Garlic is native to central Asia and has long popped up in European and African cooking, too. But it’s China that currently holds the record for most garlic grown. Per a 2012 study, China grows a staggering two-thirds of the world’s garlic, believed to be around 46 billion pounds per year.
3. AVERAGE CONSUMPTION OF GARLIC IS BELIEVED TO WEIGH IN AT AROUND TWO POUNDS PER PERSON.
4. GARLIC’S HEALTH BENEFITS ARE MYRIAD, INCLUDING AN ABILITY TO REDUCE CHOLESTEROL.
The best way to release the health-happy power of garlic is to cut it, which then turns garlic’s thio-sulfinite compounds into allicin, an antibiotic and antifungal that is believed to reduce “bad” cholesterol, as it inhibits enzymes from growing in liver cells.
5. ALLICIN IS ALSO GOOD AT COMBATING HEART DISEASE.
Allicin helps nitric oxide release in the blood vessels, relaxing them and thus bringing about a drop in blood pressure. Keeping blood vessels relaxed and lowering blood pressure is good for the heart and the rest of the vascular system (and it’s tasty).
6. GARLIC CONTAINS TONS OF VITAMINS, MINERALS, AND ANTIOXIDANTS THAT ARE GOOD FOR YOU, TOO.
The bulbs are packed with potassium, iron, calcium, magnesium, manganese, zinc, selenium, beta-carotene, zeaxanthin, and Vitamin C.
7. GARLIC’S USE AS A HEALTH AID DATES BACK TO ANCIENT HISTORY.
It’s believed that Egyptian pharaohs plied their pyramid-builders with garlic for strength, and an ancient Egyptian medical document—the Ebers Papyrus—counts a stunning 22 different medicinal uses for the plant. Garlic also pops up in texts from Virgil, Pliny the Elder, Chaucer, and Galen, all of which detail its various uses and share lore about the magic plant.
8. DESPITE ITS ASIAN ORIGINS, ITS NAME IS DERIVED FROM ANGLO-SAXON SPEECH.
9. GARLIC’S REAL HEALTH BENEFITS ARE PROBABLY THE REASON FOR ONE OF ITS MOST PREVALENT MYTHS.
Garlic had long been recognized as a wonderful health aid before writer Bram Stoker introduced the concept of the vampire—a beast repelled by garlic—to the public with his 1897 novel Dracula. In the book, Van Helsing uses garlic as a protective agent, and it’s believed that Stoker lifted that idea from garlic’s many medicinal purposes, particularly as a mosquito repellent (think of the blood-sucking).
10. YOU CAN USE GARLIC TO MAKE GLUE.
The sticky juice that’s in garlic cloves is often used as an adhesive, especially for delicate projects that involve fragile items like glass. You just need to crush the cloves to get to the sticky stuff which, despite its smell, works surprisingly well as a bonding agent for smaller jobs.
11. GARLIC CAN CLEAR UP SKIN TROUBLES.
You can battle both acne and cold sores with garlic, simply by slicing cloves in half and applying them directly to the skin. Hold for a bit—as long as you can stand!—and while the smell might not be the best, the antibacterial properties of the miracle plant will speed along the healing process.
This is a great article from Food52 on how to buy and use garlic.
There are many, many varieties of garlic, but they can all be classified as either hardneck or softneck garlic. Softneck garlic truly has a soft neck, meaning the central stalk is pliable enough to be manipulated — this is the type used to make garlic braids. Softneck garlic tends to be milder in flavor and to have more cloves per bulb (up to 20!); hardneck garlic, on the other hand, has fewer cloves but they’re larger (3, last photo) and easier to peel.
When you buy garlic, as is true when you buy onions, you’re looking for hard, dry bulbs; like onions, they’ve been cured, which means they will last longer and store well. After being cured, the roots and stalk (1, photo below) are trimmed and the outermost layer of paper wrappers is removed. The garlic is ready to hang out in a cool, dry place in your home for months. Both types of garlic store well once cured, but softneck garlic will keep for a much longer time than hardneck, which is why you’ll usually find softneck garlic at grocery stores.
If stored long enough, you’ll eventually see little green sprouts in your garlic cloves. We generally don’t bother with removing them, but if you prefer to, just flick them out with the tip of a sharp knife. ( Iread once that they are a bit bitter, so I remove them)
For those who think garlic is garlic, it isn’t all the same. Different varieties carry unique flavor profiles, but you’ll likely have to head to your local farmers market to try varieties like Inchelium Red, Kettle River Giant, Purple Glazer, and Sicilian Silver. Once you leave the supermarket, you’ll see more color variation, like purple streaks (2) in both the bulb wrappers and the cloves.
Once you get to know your local garlic farmer, you’ll have an easier time getting your hands on garlic at other stages of growth early season treats like green garlic and garlic scapes(the latter of which are only produced by hardneck garlic) and wet or fresh garlic (which is fully mature garlic that is eaten immediately after it has been harvested, without going through the curing process).
If you’ve ever come across black garlic, that’s not a specific variety, it’s garlic that’s gone through fermentation and the flavor could be described as having a lot going on: “First there’s a hit of sweetness, followed by a faint hint of smoke, then a pungency that lingers long after the sweetness is gone.” If you’ve tried it and you weren’t immediately converted to its charms, cook with it, as the flavor changes with heat.
For some, garlic cloves can be as aggravating as shallots. as recipes will call for a set number of cloves, but when heads of garlic can have such a wide range of clove sizes, there’s room for interpretation. We assume a mediumish-sized clove of garlic is about a half teaspoon once minced.
It’s hard to find a savory dish that we don’t like to use garlic in, but if garlic isn’t the first thing you reach for when you start cooking, we’ve got 5 ideas to get you started using more of it:
Pair garlic with your favorite protein: Try it with any protein
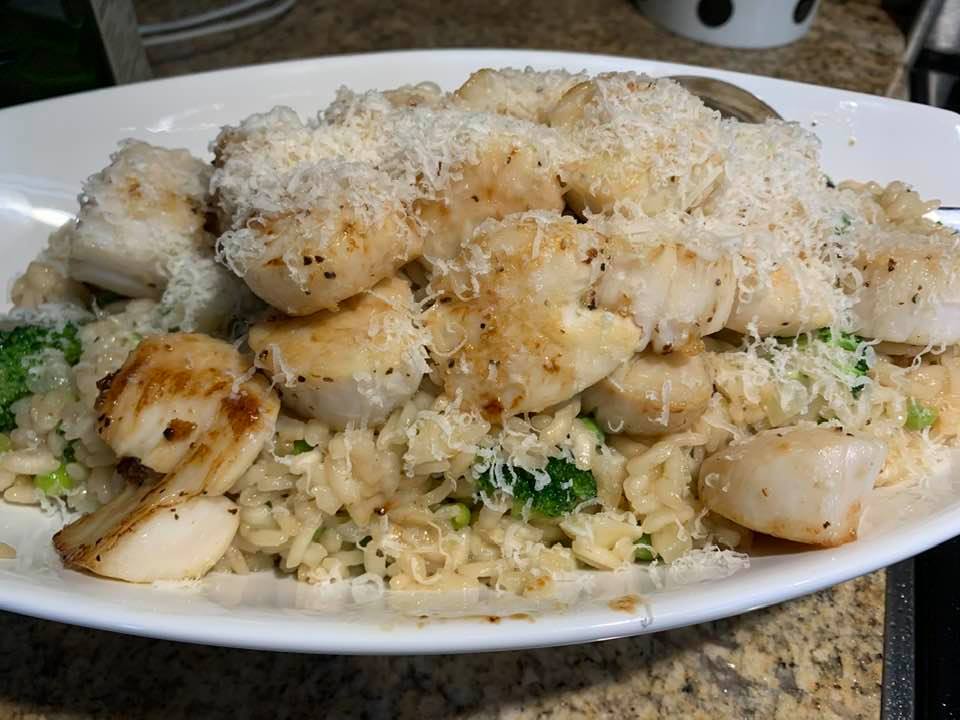
An easy and fast dinner for a weeknight. I prepared the chopped onion and garlic in the morning, so I just had to add it to the Risotto as I was cooking it. I took some frozen peas out of the freezer and had some fresh broccoli in the refrigerator left over from Farmers Market, so cut it up and got it ready.
Risotto is an easy dish, but you do have to watch and stir and watch and add more liquid. I took a bottle of wine out of the refrigerator and put it on the counter to bring to room temperature. Most people tell you to add everything “hot” to the pan, once you add the rice and EVOO, but I add at room temperature, mostly because I am a little lazy. I almost always have frozen chicken stock, so throw it in the microwave to warm, while I am cutting up veggies.
Garlic Parmesan Risotto
Risotto in 17-25 minutes?! I’m in! Garlic Parmesan Risotto may be the star of the show we call “dinner” in this easy side – it’s sure to please the whole family!CourseSide DishCuisineItalianPrep Time5 minutesCook Time20 minutesTotal Time25 minutesServings4Calories367kcalAuthorKylee Cooks
Ingredients
1/2 medium onion diced finely
4 cloves garlic minced
1 Tb s EVOO
2 Tbs butter
4 cups chicken stock
dry white wine ( I use whatever is left over in the refrigerator, so maybe half a bottle). Cheap wine gives you cheap flavor.
1 cup arborio rice
1 cup freshly grated Parmesan cheese plus extra for serving ( I only use Reggiano Parmigiano, so the flavor is the best it can be)
3 Tbs freshly chopped parsley ( I pick it from my garden, and be sure to remove all the stems, as they are bitter)
Peas and Broccoli or what ever veggie you want to add.
Instructions
Add butter and oil to a large skillet over medium heat.
Add the onions and cook until just tender, then add the garlic. Cook 1 minute longer.
Add the rice and toss to coat, (making sure oil gets onto every grain of rice if you can). Remember I did mine ahead of time.
Add the wine and stir until it is absorbed.
Add 1 ladle of stock and stir until it absorbs.
Repeat this until you have used almost all of the stock -(It should take about 17-25 minutes). Taste to make sure it is the texture you want to eat it. Not mushy, but not too al dente.
After adding the last ladle of stock, add the parsley, and promptly add the cheese.
Let it absorb until it is creamy and thick, but not soupy.
Serve, adding extra parmesan if desired.
Seared Scallops
Preheat a cast iron skillet over medium high heat.
In the meantime, pat the scallops very dry with a paper towel. Sprinkle the scallops with salt and pepper, to season.
When the pan is hot, add EVOO, then drop in your scallops, giving them enough room in between so they don’t steam each other. The scallops should make a sizzling noise when you put them in the pan.
Cook the scallops for 2 minutes, or untill you can see a little brown on the edges, making sure not to move them or touch them at all.
Flip the scallops over with a pair of tongs, and add the butter to the pan. Let the scallops cook for 1 more minute, basting the scallops with the butter.
Remove the scallops from the pan and serve over Risotto!
We served this with a Bennett Lane Pinot and loved the dinner. My granddaughter, age ten had joined us for dinner and ate two huge helpings, more that my male friend. She is quite slight, but can really eat if she loves it! Enjoy!
Make this hearty traditional French dinner of savory crêpes with a creamy sauce.
Buttery in flavor and delicate in texture, crêpes are paper thin, soft, pancake-like wrappers that are the ideal vessel for both sweet and savory fillings. Like my mother, I more often use crêpes for savory fillings, like this salmon-spinach one, but they are just as delicious when reheated in a little butter and sugar, folded, and served with a drizzle of chocolate sauce or filled with glazed cinnamon apples.
Crêpes are traditionally made in special, shallow steel pans, but I find that most home cooks, especially those new to crêperie, have an easier time with a small nonstick pan with sloping sides and an 8-inch-diameter flat bottom — inexpensive and perfect for crêpe making. If you’re new to crêpe making, I suggest making a double batch of the batter and try using a bit more batter than what’s called for (use a smidge over 1⁄4 cup) while you get used to rotating and tilting the pan to coat it evenly. The crêpes will be a bit thicker but still good. As you move through the batch, reduce the amount of batter until the crêpes are thin and delicate. We served this with a lovely Pinot Noir.
French Fare: Salmon And Spinach Crêpes
Prep Time: 45 minutes
Cook Time: 45 minutes
Level of Difficulty: Easy
Serving Size: 2
Ingredients
Crêpes
1 cup whole milk
1 cup unbleached all-purpose flour
3 large eggs
7 tablespoons unsalted butter, melted, divided
1/4 teaspoon fine sea salt
Sauce
1 1/2 tablespoons unsalted butter
1 tablespoon unbleached all-purpose flour
3/4 cup plus 2 tablespoons whole milk
2 to 3 tablespoons freshly squeezed lemon juice
Pinch of ground cayenne pepper
coarse salt and freshly ground black pepper
Filling
1 tablespoon olive oil
1 large garlic clove, minced
1/2 cup baby spinach, trimmed
2 tablespoons sun-dried tomatoes packed in oil, drained and chopped
1/2 teaspoon freshly squeezed lemon juice
coarse salt and freshly ground black pepper
To assemble
2 crêpes
2 4-ounce boneless, skinless salmon fillets (1 inch, 2.5 cm, thick at the center)
1 tablespoon ground Parmigiano-Reggiano cheese
2 tablespoons thinly sliced fresh chives, for garnish
Directions
For the crêpes
Put the milk, flour, eggs, 5 tablespoons of the melted butter, and the salt in a blender. Blend until very smooth, about 1 minute, stopping once or twice to scrape down the sides. Pour the batter into a medium bowl, cover, and set aside at room temperature for about 30 minutes.
If the batter has been refrigerated, allow it to come to room temperature. Set a 10-inch nonstick skillet with sloping sides and an 8-inch bottom over medium heat until droplets of water immediately evaporate upon hitting the pan. Using a folded paper towel, coat the skillet with a little of the remaining melted butter. Working quickly, pour a scant 1⁄4 cup batter into the center of the pan while lifting the pan and rotating and tilting it clockwise to cover the bottom evenly with the batter. Cook until lacy golden brown on the bottom, about 1 minute. Carefully slide a heatproof spatula under the crêpe and turn it over, then continue cooking for another 30 seconds, until the crêpe is just beginning to brown in spots. Slide the crêpe onto a wire rack. Repeat with the remaining batter, lightly greasing the pan when necessary (about every other crêpe) and stacking the crêpes as they are cooked.
For the sauce
Whisk the butter in a small saucepan over medium heat until melted and bubbling. Add the flour and cook, whisking constantly, until smooth and bubbling but not browned, 1 minute. Pour in the milk and continue cooking, whisking constantly, until thickened and boiling. Cook for 1 minute, then slide the pan off the heat. Add the lemon juice, cayenne, and salt and pepper to taste, then whisk until blended. Taste and adjust seasonings as needed. Set aside to cool.
For the filling and assembly
Warm the oil in a medium, ovenproof skillet over medium heat, then add the garlic and cook, stirring frequently, until light brown and fragrant, about 2 minutes. Add the spinach and cook, stirring frequently, until it’s wilted and well coated with the oil. Slide the pan off the heat, add the sun-dried tomatoes, lemon juice, and salt and pepper to taste, and toss until blended. Taste and adjust seasonings as needed. Set aside to cool.
Position a rack in the center of the oven and heat the oven to 425°F. Have ready the crêpes, sauce, and spinach.
Arrange the crêpes on the counter. Place a salmon fillet down the center of each crêpe and season with salt and pepper. Spoon the spinach mixture evenly on top of the salmon. Fold one side of the crêpe up and over the filling and repeat with the other side. Arrange seam-side up, about ¾ inch apart, in the same skillet.
Spoon the sauce evenly over the crêpes and sprinkle with the cheese. Bake until the sauce is bubbling, the top is browned, and the salmon is cooked, 18 to 20 minutes. Move the skillet to a rack, sprinkle with the chives, and serve immediately.