The Trick That Will Keep You From Ever Burning Your Garlic Again

I found this interesting article online this morning a site called “My Recipes”.  Since most of us love cooking with garlic and have most likely burned it somewhere along the way, I thought this information might be useful.

getty-garlic-image

Michael Goldman/Getty Images

Garlic might be one of the worst foods to burn, because there’s no turning back once you do. Unlike other veggies or meats that aren’t completely ruined if you just so happen to give them a little extra char than you intended for, garlic cannot withstand even 10 seconds too long over a flame. It turns black almost immediately and acquires an off-putting, bitter taste that can ruin an entire dish. The only fix to burning garlic is starting over.

So here’s how it usually happens: You’ve got your oil heating in a skillet, maybe with an onion or some other aromatics, and you add a clove or two of minced/finely chopped garlic. Seems legit, right? We’ve got to start building the flavor of this dish at some point, so we might as well start now. Ehhhh…sure, you can do this, but just know, that if you’re going to burn your garlic, this is how it’s done. Despite the lovely, garlicky aroma that will immediately engulf your kitchen upon dumping this fresh garlic into hot oil, this is oftentimes where things take a turn for the worst. Take your eyes away from that pan for more than a minute or two (especially if you turned on the heat with no abandon), and you’ve got yourself a handful of garlic that’s burned to a crisp. Not only that, but the oil and whatever other veggies are in that pan are going to taste pretty darn rotten, too.

Instead, if you simply punch down on a whole garlic clove with the side of your knife, gently crushing it so that it’s paper skin falls off and it’s slightly cracked open, you’ll still be able to impart that garlicky flavor into the oil. By prepping the garlic this way, you’ll avoid creating so much exposed surface area (like you do when you mince it) that the whole chopped clove immediately turns to a pile of ashes after 60 seconds of sizzling. Smaller bits burn quicker. If you really want to go the minced clove route, wait until the middle of your cooking process to add it to the concoction. This way, there’s less cooking time for your precious garlic to burn, and likely, more ingredients in the pan to help disperse the heat and act as a buffer for your delicate aromatic. Once you’ve got your slightly flattened cloves, put them in a skillet with oil (don’t be shy, a couple of generous glugs will do) over LOW HEAT. This temperature adjustment is crucial.

Once you’ve got your cloves gently cooking in oil over low heat, this is where the magic happens. Give the cloves some time to release their essence throughout the oil. As they start to cook, you can increase your heat to medium-high so that the white-ish cloves turn a warm, golden brown. If you rush this, however (shame, shame), your cloves are apt to turn black, so it’s important to keep a close eye. Before you go ahead and serve these babies, make sure that you’ve cooked them long enough. Because the cloves are whole, it’s going to take a little longer to soften and they may hold on to that raw, sharp taste.

When your cloves appear caramelized on the outside and creamy on the inside, you better be salivating, because you just created a garlic-infused oil. At this point, you can fish out the cloves, and add them to the blender to make a pesto, hummus or any other dip/sauce that could use a garlicky punch, or spread them atop a piece of toast, which should then rightfully be finished with a frizzled egg. One of my favorite restaurants, that is no longer open served baked garlic on toasted pita bread.  It was delicious. That and a nice Cabernet Sauvignon was delightful with conversation.  Not the best for a first date, if you live in “that” world.

With the wonderful oil that you’ve so carefully concocted, you can make stir-fries, one-pan pasta sauces, soups, or whatever dish you want to be laced with fresh, garlicky flavor. Ultimately, this is not the only way to cook garlic, however it’s, in my opinion, a foolproof method that consistently creates a pronounced yet not-too-overwhelming garlic flavor. And I’ve burnt garlic too many times to go back to my old ways.

Sara Tane wrote the original article.  January 2018

&lt;a target=&amp;quot;_blank&amp;quot; href=&amp;quot;https://adclick.g.doubleclick.net/pcs/click?xai=AKAOjsvSpZ0iov_M5IU91evwl3DCOVVHzMW1eA5bzxdTxecX-HSHOLmPoTs1xaHIOUP8Wo3p954vuCpjDIPnc6puNjLkfeTFK1VceF_5WQlZWx4h92WZ9xb2nmiZTX3AQX9x3d2z8l69D3xv2lwhrt6d1xxxXjI09YMDQNPS7VIXfFpBxTVMz0jLIr6kf0GQUH7OYDxjtU2dWiqspdxm0RlF-qYEOC3eStJBsUeaoJRvfEJopx8m9Cqdf_qVGrJz_fiatJCMrPHWOml_w1iIbdmBys9zKS3gxtG3xm6W-EzQBgjaoCfkmF30AWt9oDLdOxoKlVeULeVN_hCuov3kBv1rXwILPkTgn1TK2p1VgwHGU5wqIwcBoYUerp4uvT8wN4ZkTYbzST3AysSwuLD4iy1cVA2UYdVIXJzyJCJIfJ9B0LZBeMiGGxVxZJahMnsU9O-YCkl59M82Q7XHo169xyCaGi_FmP-FA6PEOZotkJxBoxr-54dor0RfvHfqwn7cV8dz2v1YJvL4Bt_LuDZ4PYncDqI2_8gZYrR4qpvRgwcu4y1bGSKY9eYJ1VhEfquj-lgQeNcyGpOyq9jorBK433jHPC2Ox4u0Qfg_nGO2SUy51BNv49ibgzTUPKNSHHMTYO647pt_V68eqFcXTyGprpxxLXzGQ45FqvDIeelQXr_SeZNfjIzRMWslU-8CQw6HB3jH3QQI6KKr-VIHs1EA17VSzndVIrC5T8yIHs8gdf0hZ9tUZb4dSvVFQ-27KIn_aRAyWruTy0bENst7cJJK6-LEBzcfSVZ-PVhJgQtgCu4J6ANEbRwaPfGpfPnv7eF0ijvyILL8B6U&amp;amp;amp;sig=Cg0ArKJSzA5EPHI369luEAE&amp;amp;amp;urlfix=1&amp;amp;amp;rm_eid=1938368&amp;amp;amp;ctype=38&amp;amp;amp;adurl=http://www.flipp.com&amp;quot;&gt;&lt;img src=&amp;quot;https://s0.2mdn.net/ads/richmedia/studio/pv2/60052111/20170925102450494/QFC-Fallback-Leaderboard.png&amp;quot; width=&amp;quot;728&amp;quot; height=&amp;quot;90&amp;quot; border=&amp;quot;0&amp;quot; /&gt;&lt;/a&gt;&lt;img width=&amp;quot;0px&amp;quot; height=&amp;quot;0px&amp;quot; style=&amp;quot;visibility:hidden&amp;quot; border=&amp;quot;0&amp;quot; src=&amp;quot;&amp;quot; /&gt;<span id=”mce_marker” data-mce-type=”bookmark” data-mce-fragment=”1″>​</span>

The Trick That Will Keep You From Ever Burning Your Garlic Again

How to organize your kitchen like a chef.

Restaurant cooks share their secrets of efficiency and I share this article with you.
How to Organize Your Kitchen like a Chef

Photo: Bellecour

You know that friend who has complete mastery of her own kitchen? The home cook who can whip up a meal on autopilot, seemingly without even looking at what she’s doing? She may be a really talented cook, but the command of her work space is likely due more to excellent organization than it is to some sort of unusual intuition.

Here’s how you can be that friend: by taking cues from professional chefs when it comes to organizing your home kitchen.

The golden rule of kitchen organization: Eliminate physical steps.

How should a home cook begin to think about organizing his or her work space? “Reduce the number of steps you take,” Ryan Peters, chef/owner of Pittsburgh’s Brunoise, says. Chefs set up their spaces to reduce movement during service; equipping your home kitchen so that you don’t have to take many steps while cooking is the secret to making it feel functional and organized.

Think about your kitchen in stations.

A commercial kitchen has a prep area, several cooking stations, a pass and a dishwashing station. Your home kitchen also has analogous areas: prep space, a range and oven, a sink, dry and cold storage in your pantry and refrigerator, and space where you plate food or put hot dishes. You also likely have something like a beverage station or bar and a kitchen table or seating area, plus the plates and silverware that go on top of it.
Now get your flow right.

Food funnels in a professional kitchen from storage to prep to line to pass, and that’s what it should do in your home kitchen. Many kitchens are designed around a triangle, which connects the fridge, sink and range: It enables good flow while you’re working. The new triangle leaves out the refrigerator and adds a work space.

Facilitate movement by keeping anything you’re not using for cooking—your junk drawer, water glasses, serving platters—outside of the cooking triangle, but proximal to where they’ll be used: Glasses go in a cabinet near your water-dispensing fridge; dish-ware lives near your table.

Group together what you’ll need for key processes. Patrick Kelly, who runs the kitchen at Denver’s Wayward, suggests., “Have your prep area as close to your fire as possible,”  And place your trash on one side of your sink and the dishwasher on the other, so you can easily scrape, rinse and fill.

Equip your stations.

Once you’ve designated areas of your kitchen to specific types of work, equip those areas accordingly, storing the correct tools within reach. “You don’t need a knife near the stove,” executive chef Laetitia Rouabah of Benoit in NYC points out, but you do need one near your prep area. Cutting boards belong there, too.

“Pots and pans should be within super-easy access of your stove,” Kelly says, whether that means on a rack above it or in a cabinet below it. Kelly’s home kitchen also has separate drawers for sweet and savory prep, and he stores plating spoons and tweezers close to where he actually plates.

Be sure everything you own gets a home: “If your tools don’t have a home, they will end up anywhere you can fit them,” Jonathan Searle, the Lexington, Kentucky-based executive chef of Lockbox, says.

And don’t forget that equipping your stations includes easy access to seasoning you use frequently: “I have salt and pepper everywhere,” Kelly says.

Master your food storage.

The key to feeling like you’ve got every ingredient at your fingertips? Stacked storage and proper labeling. “Invest in a set of like-sized stackable plastic containers,” Searle says. “This will allow you to keep your dry pantry clean and organized.” Kelly extends that mantra to his fridge, storing prepped ingredients in clamshell containers with clear plastic lids.

Once you’ve filled those containers, “label absolutely everything,” Peters says. “If you’re properly organized, everything is labeled and facing out when you look in your cupboard.”

IMG_5026

Here is a photo of my happily labeled pantry,

IMG_5025

and my alphabetically labeled spices.

How to organize your kitchen like a chef.

Chicken Parmesan is wonderful!

IMG_6585

I was testing different fresh mozzarellas to see the difference and had three partially used containers in the refrigerator, so decided to try this recipe that come on a newsletter from Tasting Table Test Kitchen.  It was so yummy and so very easy to make.  Make everything ahead of time and throw in the oven thirty minutes or so before dinner time.  I served with fresh asparagus, but didn’t bother eat any myself, as the parmesan was so delightful.

I always save the rinds from my reggiano parmesano to use in cases like this.  Add it to most any soup and it adds enough flavor that you can taste the wonderful difference. Happy Cooking!

Chicken Parmesan

Add a Parm rind to your tomato sauce for the cheesiest version of the Italian favorite
Chicken Parmesan

Photo: Dave Katz/Tasting Table

This classic Italian comfort food combines juicy breaded chicken and tomato sauce, covered in melty cheese. So what takes our chicken Parm to the next level? A Parm rind simmered in the tomato sauce for richness and an intense cheesy flavor. The finished dish is great on its own or served over pasta or on a hero roll.

This dish is all about the layering: After nestling the seared chicken in half of the sauce, don’t cover the entire breast when spooning the remaining sauce over top. You want some of that crust to maintain a crisp texture that will hold onto the melting cheese. Another tip: You can even prepare the dish the night before and refrigerate. The next day you’d just need to pop it in the oven and bake.

To learn more, read “No Parm, No Fowl.”

Chicken Parmesan

Recipe from the Tasting Table Test Kitchen

Yield: 4 to 6 servings

Prep Time: 20 minutes

Cook Time: 1 hour and 20 minutes

Total Time: 1 hour and 40 minutes

INGREDIENTS

For the Tomato Sauce:

¼ cup olive oil

1 medium onion, finely chopped

6 garlic cloves, thinly sliced

Pinch crushed red pepper flakes

One 28-ounce can whole peeled San Marzano tomatoes, crushed by hand

¼ cup basil leaves, roughly chopped

1 tablespoon sherry vinegar

2 teaspoons sugar

One 4-inch Parmesan rind

Kosher salt and freshly ground black pepper, to taste

For the Chicken Parmesan:

2 cups dry panko

½ cup grated Parmesan cheese, divided

2 teaspoons dried oregano

½ cup flour

3 eggs, beaten

4 medium (2 pounds) chicken breasts

Kosher salt and freshly ground black pepper, to taste

Tomato sauce

⅓ cup canola oil

8 ounces fresh mozzarella, thinly sliced

Thinly sliced basil leaves, for garnish

DIRECTIONS

1. Make the tomato sauce: In a medium saucepan, heat the oil over medium heat. Add the onion, garlic and crushed red pepper flakes, and cook, stirring frequently, until softened, 10 to 12 minutes. Add the tomatoes, basil, vinegar, sugar and Parmesan rind, and bring to a simmer. Lower the heat to medium low and cook, stirring occasionally, until slightly thickened, about 25 minutes. Discard the Parmesan rind and, using an immersion blender, blend the sauce until slightly smooth while retaining some texture. Season with salt and pepper to taste.

2. Make the chicken Parmesan: In a small bowl, whisk together the panko bread crumbs with ¼ cup of the grated Parmesan and the dried oregano. Transfer to a shallow dish, such as a pie plate. Transfer the flour and the beaten eggs to shallow dishes as well, then line up the 3 dishes next to each other in the order of flour, eggs and bread crumbs.

3. Season the chicken breasts with salt and pepper. One by one, dredge the chicken breasts in flour, followed by egg and panko, making sure to completely coat each breast. Place chicken breasts on a plate until ready to fry.

4. Preheat the oven to 375° and spread half of the tomato sauce in a 9-by-13-inch baking dish, then set aside. In a 12-inch skillet, heat the canola oil over medium-high heat. Cook the chicken breasts, turning once, until golden brown, 5 minutes per side. Transfer the chicken to the prepared pan, then nestle them into the tomato sauce. Pour the remaining half of the tomato sauce over the middle of each breast, making sure to not completely cover all of the breasts with tomato sauce. Layer the mozzarella and sprinkle the remaining Parmesan on top.

5. Bake until the chicken reaches an internal temperature of 165°, 25 to 30 minutes. Turn the oven to broil and bake until the cheese is bubbling and golden brown, 2 to 3 minutes more. Garnish with basil and serve.

Chicken Parmesan is wonderful!

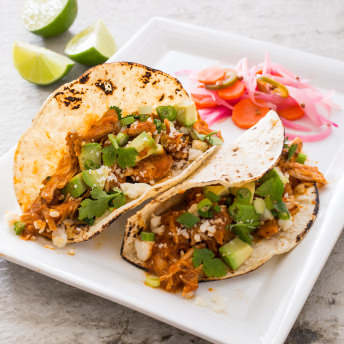
Chicken Tacos sound better as: “Tinga de Pollo”

Tinga de Pollo

This is simmering and smelling wonderful.  I am surprised my neighbors are not knocking at my door.

WHY THIS RECIPE WORKS

Tinga de pollo is typically made by poaching breast meat separately from the tomato-and-chipotle-based sauce and combining the two only briefly at the end. For deeper flavor, we chose boneless thighs and cooked them directly in the sauce. Fire-roasted tomatoes increased smokiness, and a little brown sugar and lime juice and zest further boosted the complexity. Simmering the cooked shredded chicken in the sauce for a full 10 minutes before serving gave the sauce a chance to thicken and loosened the chicken’s muscle fibers so the sauce could really work its way into every crevice in the shredded meat’s abundant surface area.

INGREDIENTS

CHICKEN

2 pounds boneless, skinless chicken thighs, trimmed
Salt and pepper
2 tablespoons vegetable oil
1 onion, halved and sliced thin
3 garlic cloves, minced
1 teaspoon ground cumin
¼ teaspoon ground cinnamon
1 (14.5-ounce) can fire-roasted diced tomatoes
½ cup chicken broth
2 tablespoons minced canned chipotle chile in adobo sauce plus 2 teaspoons adobo sauce
½ teaspoon brown sugar
1 teaspoon grated lime zest plus 2 tablespoons juice

TACOS

12 (6-inch) corn tortillas, warmed
1 avocado, halved, pitted, and cut into 1/2-inch pieces
2 ounces Cotija cheese, crumbled (1/2 cup)
6 scallions, minced
minced fresh cilantro
Lime wedges

INSTRUCTIONS

SERVES 6

In addition to the Mexican-Style Pickled Vegetables (Escabèche) and the toppings included here, Mexican crema (or sour cream) and minced onion are also good choices. If you can’t find Cotija cheese, you can substitute crumbled feta. The shredded chicken mixture also makes a good topping for tostadas.


1. FOR THE CHICKEN: Pat chicken dry with paper towels and season with salt and pepper. Heat 1 tablespoon oil in large Dutch oven over medium-high heat until shimmering. Add half of chicken and brown on both sides, 3 to 4 minutes per side. Transfer to large plate. Repeat with remaining chicken.

2. Reduce heat to medium, add remaining 1 tablespoon oil to now-empty pot, and heat until shimmering. Add onion and cook, stirring frequently, until browned, about 5 minutes. Add garlic, cumin, and cinnamon and cook until fragrant, about 1 minute. Add tomatoes, broth, chipotle and adobo sauce, and sugar and bring to boil, scraping up any browned bits.

3. Return chicken to pot, reduce heat to medium-low, cover, and simmer until meat registers 195 degrees, 15 to 20 minutes, flipping chicken after 5 minutes. Transfer chicken to cutting board.

4. Transfer cooking liquid to blender and process until smooth, 15 to 30 seconds. Return sauce to pot. When cool enough to handle, use two forks to shred chicken into bite-size pieces. Return chicken to pot with sauce. Cook over medium heat, stirring frequently, until sauce is thickened and clings to chicken, about 10 minutes. Stir in lime zest and juice. Season with salt and pepper to taste.

5. FOR THE TACOS: Spoon chicken into center of each warm tortilla and serve, passing avocado, Cotija, scallions, cilantro, and lime wedges separately.

Condiments

Added a little Mexican Crema too!

Chicken Tacos sound better as: “Tinga de Pollo”

Rhubarb Custard Pie

My Rhubarb plant was taking over my raised bed gardens, and the beets were hidden in the shade, so I thought I had better harvest to save the beets.  I love the look of the rhubarb plant and would add a photo, if it were not so drizzly and wet and ugly outside, but I am not a huge rhubarb fan.  My husband told me he loves rhubarb pie, so I thought at seven last night, after dinner I should bake him a pie.

Most rhubarb pies are combined with strawberries to add a little more sweetness, but I did not have any strawberries and did not want to run to the store (again).  So I looked online for an America’s Test Kitchen recipe and found one that looked good.

Rhubarb Custard Pie

From Cook’s Country | April​/May 2011
WHY THIS RECIPE WORKS:

We used a double crust for our Rhubarb Custard Pie dough, but we found that a lattice top crust worked just as well. Cooling the pie completely ensured that the juices didn’t leach out when we cut into it.

SERVES 8

INGREDIENTS

INSTRUCTIONS

  1. 3. Bake until juices are bubbling and crust is golden brown, about 50 minutes. Cool completely on wire rack, about 4 hours. Serve.

    Notes:

    1. Duck eggs worked great for this recipe, as they are bigger, so less chance of soggy filling.

    2. I cut the rhubarb into about two inch chunks and put in my Breville Food Processor.  Made the process a lot faster and it was in nice small pieces.

    3. Add a little tad extra sugar and don’t forget the salt, as it enhances the flavor.

    Double-Crust Pie Dough

    From Cook’s Country | October/November 2011

    WHY THIS RECIPE WORKS:

    For our Double-Crust Pie Dough recipe, we wanted the best of two worlds: The rich flavor of a butter crust and the flakiness of a shortening crust. Combining the two fats gave our pie dough optimum flavor and texture. To quickly cut the fats into the flour, we turned to our food processor, but… read more

    MAKES ENOUGH FOR ONE 9-INCH PIE

    INGREDIENTS

    • 2 1/2 cups all-purpose flour, plus extra for rolling out the dough
    • 2 tablespoons sugar
    • 1 teaspoon table salt
    • 8 tablespoons vegetable shortening, cut into 1/4-inch pieces and chilled
    • 12 tablespoons unsalted butter (1 1/2 sticks), cut into 1/4-inch pieces and chilled
    • 6 – 8 tablespoons ice water

    INSTRUCTIONS

    1. 1. Process the flour, sugar, and salt in a food processor until combined. Scatter the shortening over the top and process until the mixture has the texture of coarse sand, about 10 seconds (see related Tip). Scatter the butter pieces over the top and, using short pulses, process the mixture until it resembles coarse crumbs, about 10 pulses. Transfer to a bowl.

      2. Sprinkle 6 tablespoons of the ice water over the mixture. Stir and press the dough together, using a stiff rubber spatula until the dough sticks together. If the dough does not come together, stir in the remaining water, 1 tablespoon at a time, until it does.

      3. Divide the dough into two even pieces and flatten each into a 4-inch disk. Wrap the disks tightly in plastic wrap and refrigerate for 1 hour. Let the chilled dough soften slightly at room temperature before rolling it out and fitting it into a pie plate.

      To Make Ahead

      The dough can be refrigerated, wrapped tightly in plastic wrap, for up to 2 days or frozen for up to 2 months. Let the frozen dough thaw on the countertop until malleable before rolling.

      Notes:

      1. This is a very tender pie crust and a bit sticky, so after leaving in the refrigerator for an hour ( I got away with 30 minutes) roll it out between two pieces of parchment paper.  Put a little flour on the each side of the paper or the dough will stick to the paper.

      2. When you cut the extra off the edge of the crust when you add the top layer, blend it into the edge of pie, so you don’t have waste and so the edges are a little thicker.  I like to double my edges like my grandmother did.

      And now enjoy!  IMG_5189

      And I think he liked it for breakfast!

      You can view my artwork at http://www.dianakingsley.net

Rhubarb Custard Pie

Chicken Strikes Again

Love the concept of one dish dinners, especially when it actually tastes great.  This recipe was in Bon Appetit’s One Dish Dinner book.  It did not take long to prepare, and the combination of fennel and leeks was sweet and wonderful.  A bit of butter never hurt.  My orzo was not tender with the 2.5 cups of chicken stock, so of course I just added more wine.  A win win.

My husband was hungry, so I served him Butternut Squash with a little sour cream, topped with dill from my garden.  (forgot to take a photo)  The recipe is below.

Screen Shot 2017-05-04 at 6.26.11 PM


IMG_5126

Thought I wold share a photo from my garden.  Guess cooking and gardening are my favorite things to do when I am not painting or with my beautiful granddaughter.

Chicken Strikes Again