

Earlier this week I took a pie baking class that was offered for free via our local library at the Village Green in Kingston, Washington. A local baker taught the class and it was quite entertaining and I did learn a couple new tricks. I don’t make many pies, but do enjoy the process. I personally use the basic pie dough recipe from America’s Test Kitchen, but do it all by hand rather than using a food processor. Here is their recipe that I use:
INGREDIENTS:
2 1/2 Cups unbleached all purpose flour
1 tsp salt
2 Tbs sugar
12 Tbs cold unsalted butter (1 1/2 sticks) cut into 1/4″ slices
1/2 cup chilled solid vegetable shortening cut into 4 pieces (Crisco or lard)
Vodka is essential to the texture of the crust and imparts no flavor—do not substitute extra water. The alcohol is key to our recipe; if you don’t have vodka on hand, you can use another 80 proof liquor. This dough will be moister and more supple than most standard pie doughs and will require more flour to roll out (1/4 cup must be used to prevent the dough from sticking to the counter).
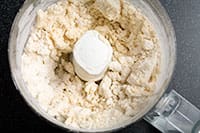
1. Process 1 1/2 cups flour, salt, and sugar in food processor until combined, about 2 one-second pulses. Add butter and shortening and process until homogenous dough just starts to collect in uneven clumps, about 15 seconds (dough will resemble cottage cheese curds and there should be no uncoated flour). Scrape bowl with rubber spatula and redistribute dough evenly around processor blade. Add remaining cup flour and pulse until mixture is evenly distributed around bowl and mass of dough has been broken up, 4 to 6 quick pulses. Empty mixture into medium bowl.
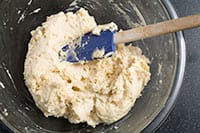
2. Sprinkle vodka and water over mixture. With rubber spatula, use folding motion to mix, pressing down on dough until dough is slightly tacky and sticks together. Divide dough into two even balls and flatten each into 4-inch disk. Wrap each in plastic wrap and refrigerate at least 45 minutes or up to 2 days.
STEP-BY-STEP
Key Steps to Foolproof Pie Dough

1. MAKE A FAT AND FLOUR PASTE:Completely blending part of the flour with all of the butter ensures a consistent amount of fat-coated flour in the final dough.
2. ADD MORE FLOUR: Pulsing in the final cup of flour ensures a consistent amount of uncoated flour in the final dough.
3. ADD WATER AND VODKA: Sprinkling with water and vodka ensures even distribution. No need to skimp—unlike water, vodka won’t make the dough tough.
Making Foolproof Pie Dough Without a Food Processor
If you don’t have a food processor, you can also prepare this recipe in a stand mixer: Start by bringing your butter and shortening to room temperature. Add 1 1/2 cups flour, salt, and sugar to bowl of stand mixer fitted with paddle attachment; mix on medium-low speed until just combined, 4 to 5 seconds. Add butter and shortening to mixer and mix on medium-low speed for another 15 seconds, until dough starts to form around paddle. Scrape down sides of bowl and paddle with spatula. Add remaining cup flour and mix on medium-high speed until dough has broken into smaller pieces, 2 to 3 seconds. Empty contents into medium bowl and continue recipe from step 2.
***Here are the notes from the class I took. I enjoyed the class, but was not successful with her dough recipe. I don’t like egg in my dough and could never get it to come together. Maybe my hands are not warm enough?
~It’s as easy as Pie~
Per the paper handed out in class (My notes in italics)
There are simple steps to creating a beautiful handcrafted flaky crusted pie, which do not require you to be a professional baker. At the bakery we are often asked about how we make such beautiful pies. The answer is of course, practice. (smile) When you follow these simple steps you will get not only a pretty looking pie, but one that tastes delicious as well. I will have to say it looked great and tasted good.

Notes to start:
- The filling
Fruits: Simple always tastes better. When we bake or cook we are often under the pretense that the more spices the better it will taste. With pies it is the opposite. The more you let the fruit speak for itself, the better. Everyone wants their peach pie to taste like fresh picked juicy peaches. So use simple ingredients and you will achieve that taster perfection.
Sugar: Sugar is good, don’t ever let anyone tell you different.
Cream: If you can make you own pudding it will always taste better. The trick is constant stirring and whole milk! You can add whatever flavor you like to a plain vanilla pudding recipe.
Savory: Once again, simplicity is better. A classic bacon and cheese combination for the carnivore or a simple spinach, tomato and feta for the vegetarians will always satisfy the savory taste buds.
- The “elusive” flaky crust (cook with clarified butter)
Flakiness is achieved through several steps
- Low gluten – choose an all-purpose flour instead of a bread flour (They use Sheppard’s Grain bread, which is available in bulk at Central Market)
- Use butter
- Butter. Flakes of butter will melt away leaving little tiny pockets that turn into the flakes you love in pie crust.
- Little contact – When you add moisture to flour it almost immediately reacts. The proteins in the flour start to form gluten strands and the dough starts to have a spring to it. This great when working with bread, as you want it to rise. But with pie crust, you don’t want that. The more you work the dough the tougher the crust becomes and that is when you start having shrinking dough or dough that won’t roll out. (I used to do mine in the food processor, as I learned to do in the 80’s, but it was always a little too tough)
- The Temperature – This is the key part to baking your pie. You want the pie to set. This means you want to bake it on a high heat for 15 minutes. 425 for the first 15, then drop it to 350 for the last hours. (In class she said to heat the oven the 425, then turn down to 350 when you placed the pie in the oven)
Bakers Tips
- Partially frozen fruit will bake better and won’t leave you with a soggy crust
- Flour and sugar on the bottom of the crust will soak up liquid (This is one of the main things I learned from the class.)
- Dough is better if it’s a little floury, a warm hand will melt the butter and make an easy roll out
- If making apple pie, precook the apples stovetop to remove the liquid or as The Pie and Pastry Bible, by Rose L. Bernbaum. Mix your sliced apples, sugar, and spices together. Let sit for 30-40 minutes. Then drain off liquid and boil in a small pan until reduced by half. Mix this “syrup” back into your apples–add a little flour, then pile apples in crust and bake
Lacey’s Pie Crust Recipe
One crust Double crust
1.5 cups flour 4 cups flour
1 tsp sugar 1 Tbs sugar
1 tsp salt 1 Tbs salt
1 egg 1 egg
½ cup butter (cold) ¾ cup butter (cold)
½ cup Crisco ¾ cup Crisco
3 Tbs cool water Never really wrote or said how much, 6 Tbl ??
- Grab a bowl large enough that you will be able to move flour around without getting too messy. Measure out four, sugar & slat into the bowl and stir briefly.
- Add your eggs (she said to only use one) to the flour mixture. Break the yolks with your fingers and stir gently until the eggs are mixed into the four – about 15 seconds.
- Cube your butter into ½” squares. Add it to your flour mixture. Squeeze the butter between your fingers with the flour till your mixture looks like bread crumbs – about 2 minutes
- Slowly add in your water, folding the mixture onto itself, until it is a cohesive dough. This part is important. You may not need all of the water, so go slowly. If you add too much water the dough will become too soft and will tear during rolling. Do not over knead the dough or it will become tough. When you squeeze the dough in your fist and it hold together in a ball it is done!
- Cut the dough in half. Fatten each half in to a disk. At this point you can roll the dough, refrigerate the dough for up to 2 days, or freeze the dough for up to two months.
- T roll the dough, sprinkle flour on the surface, not so much that you will have mounds of flour, but not so little that your pie dough will stick to the counter.
- Sprinkle a little flour n top of the dough and begin the rolling process. Start in the middle of the dough and roll out. I like to pretend the round dough is a clock. I roll to 12, then to 3, then to 6, then to 9 and then I flip the dough over. Sprinkle with a little more flour and repeat the “clock” process.
- Roll the dough until it is the size you need based on your pie plate. If you have a 9” pie plate, you will need to roll the dough an extra three inches to account for the deepness of the plate and the edges of the pie.
- Fold your dough in half and transfer to the pie plate centering it. (I learned to roll the dough around my rolling pin and then unroll atop the pie plate centering it.)

If you are making a cream pie, crimp your edges, poke holes in the bottom of the crust and place your pie crust in the freezer for 10 minutes. When the 10 minutes is up, place pie weights in the bottom of your crust and place in a preheated over ~350 degrees for 10 minutes or until brown. (I always put the pie weights atop parchment, so they are easy to get off when done and easy to put back into a container.) Let the crust cool before adding your cream mixture. Refrigerate an hour before serving.
If you are making a fruit pie, decide if you want a top crust or if you want a crumble topping. If you want a top crust, follow steps 6 – 8 and fold dough in half. You will need to prep your bottom crust for the fruit, as fruit has a lot of moisture in it and will make the bottom crust soggy. If you sprinkle a layer of flour and sugar mixed together with your fingers on the bottom before the fruit, the problem should be eliminated.

Next add your fruit, and either sprinkle with the crumble or lay your top crust over the fruit. The excess dough should the touch the counter as it hangs over the edge of your pie plate.

Gently fold the top crust up and around the edge of the pie plate collecting the edge of the bottom crust as you do. Crimp the crust using your thumb and pointer fingers. Poke holes in the top for steam to escape. Sprinkle the top with sugar and cinnamon, making sure to get sugar in the crimped edges. Bake at 425 for 10 min, then turn the oven down to 350 for 45 minutes or until the pie is done.
Your pie is done when it does not jiggle, and fruit has a slow bubble to it.
If you are doing a savory pie, do not add sugar atop the crust or on the bottom before adding your savory, but do add the flour.
Apple Filling
8 medium/large golden delicious apples. Goldens are juicier and have a higher water content. Hard apples like Granny Smith will hold the apple shape better and will be crisper to the bite.
¼ cup flour
2 cups sugar
2 Tbsp cinnamon
I learned to put flour and sugar in your crust before you add your fruit and if it is savory just add the flour. Simple tip that really works. I realized I liked the recipe that I use from America’s Test Kitchen more than the one we made. Now I need to make more pie!


